- 1.0 Introduction
- 2.0 Understanding C Purlins
- 3.0 C Purlin vs. Z Purlin: What’s the Difference?
- 4.0 How to Choose the Right C Purlins for Your Project
- 5.0 Tools and Materials You’ll Need
- 6.0 Pre-Installation Planning and Design Considerations
- 7.0 Step-by-Step Guide: Installing and Connecting C Purlins
- 8.0 Inspection and Final Adjustments
- 9.0 Common Mistakes to Avoid
- 10.0 Additional Tips for Safe and Effective Installation
- 11.0 Conclusion
1.0 Introduction
C Purlins are critical structural components widely used in roofing and wall framing for residential, commercial, and industrial buildings. They form the primary support for roof decks, wall cladding, and ceilings. While high-quality materials are essential, proper installation and connection techniques are crucial to ensure structural strength, stability, and longevity.
Incorrect installation can lead to misalignment, structural failure, costly repairs, or safety hazards. This comprehensive guide provides step-by-step instructions for selecting, installing, and connecting C Purlins effectively, whether you’re a contractor, DIY enthusiast, or site supervisor.
2.0 Understanding C Purlins
2.1 What Are C Purlins?
C Purlins are horizontal structural members made from high-tensile galvanized steel (commonly G450, G500, or G550 grades), cold-formed into a “C” shape. They are lightweight yet strong, providing excellent load-bearing capacity.
2.2 Applications
- Supporting roof sheeting and wall cladding.
- Spanning between rafters or wall studs.
- Transferring loads to the primary structural frame.
2.3 Material & Coating
- Made from high-strength galvanized steel.
- Zinc coating (minimum Z350 or 350g/m²) offers excellent corrosion resistance, making them ideal for outdoor and coastal applications.
3.0 C Purlin vs. Z Purlin: What’s the Difference?
- C Purlins: Ideal for simple spans where purlins need to sit flush on a flat surface.
- Z Purlins: Designed for longer spans as they can be overlapped at joints, enabling continuous lengths and greater structural flexibility.
Tip: Use Z Purlins when overlapping spans are needed. For straightforward installations (especially residential and light commercial structures), C Purlins are typically the better choice.
4.0 How to Choose the Right C Purlins for Your Project
4.1 Material and Coating
- High-tensile galvanized steel (G450–G550).
- Zinc coating Z350+ for superior corrosion protection.
4.2 Size and Thickness
- Standard sections: 100mm to 350mm (special sizes up to 400mm available).
- Match section size and thickness to the roof span, design load, and local conditions.
- Consult structural load tables or a licensed engineer for accurate selection.
4.3 C vs. Z Purlin Decision
- Choose C Purlins for flush mounting on beams or frames.
- Opt for Z Purlins when overlapping connections and longer continuous spans are required.
5.0 Tools and Materials You’ll Need
5.1 Materials
- C Purlins (100mm to 350mm sections, or larger if specified).
- Bolts and nuts (typically M12 or M16 depending on purlin size).
- Bridging components (boltless or bolted systems).
- Safety mesh and hangers if required.
5.2 Tools
- Measuring tape and laser level.
- Metal saw or grinder.
- Drill with high-speed steel bits.
- Wrenches or impact drivers.
- Safety equipment: gloves, helmet, harness.
- Turnbuckles for fine alignment adjustments.
6.0 Pre-Installation Planning and Design Considerations
6.1 Structural Adequacy
- Verify design capacity with a licensed structural engineer.
- Ensure compliance with national design codes (e.g., AS/NZS 4600, AISC standards).
- Confirm purlin section sizes, hole positions, and lap lengths.
6.2 Corrosion Prevention
- Avoid direct contact between galvanized steel and copper to prevent galvanic corrosion.
- Apply zinc-rich primer or cold galvanizing spray on cut edges to maintain corrosion protection.
6.3 Thermal Expansion
- For long roofing spans, include expansion joints to accommodate thermal movement.
- Systems such as the Farlap Roof Lap Joint simplify expansion joint construction.
7.0 Step-by-Step Guide: Installing and Connecting C Purlins
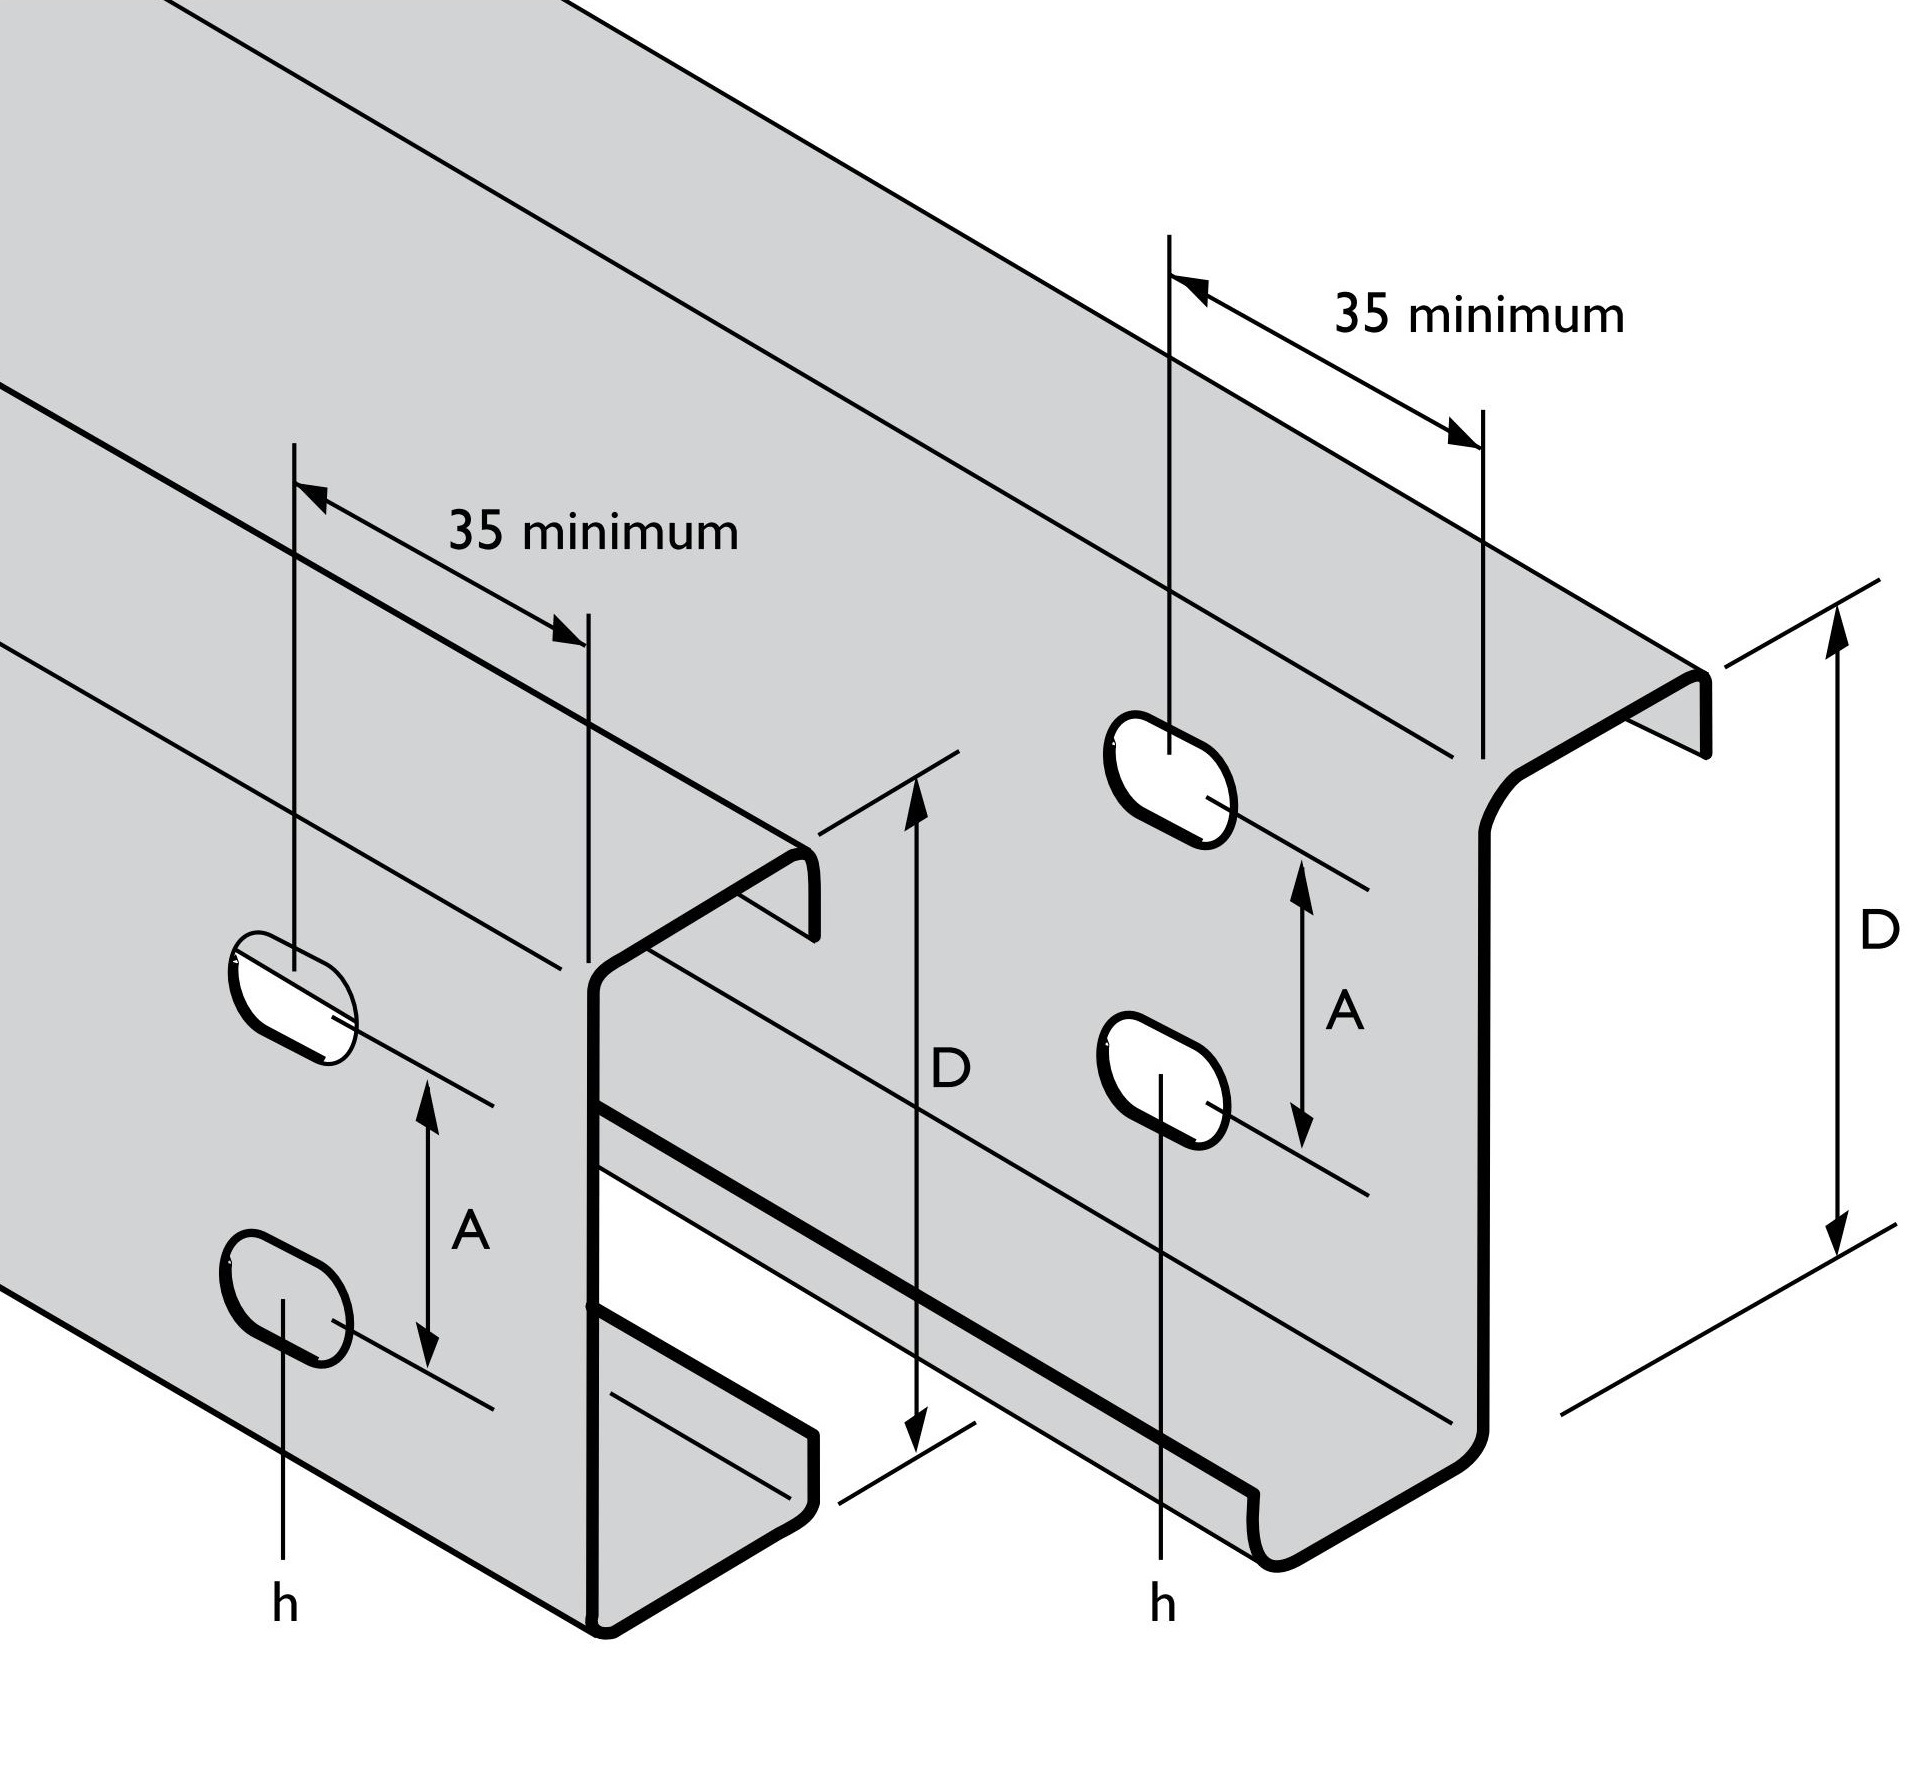
| PURLIN SIZE | AISC CENTRES | |
| D | A | h |
| mm | mm | mm |
| 100 | 40 | 18×22 |
| 150 | 60* | 18×22 |
| 200 | I0 | 18×22 |
| 250 | 160 | 18×22 |
| 300 | 210 | 22 diameter |
| 350 | 260 | 22 diameter |
7.1 Hole Punching
- Standard purlins come with pre-punched holes according to AISC center-to-center standards.
- Non-standard purlins or those without pre-punched holes can be perforated using a specialized punching machine.
- If additional holes are needed:
- Measure holes center-to-center, not edge-to-edge.
- Maintain a minimum distance of 35mm from the purlin end to the first hole.
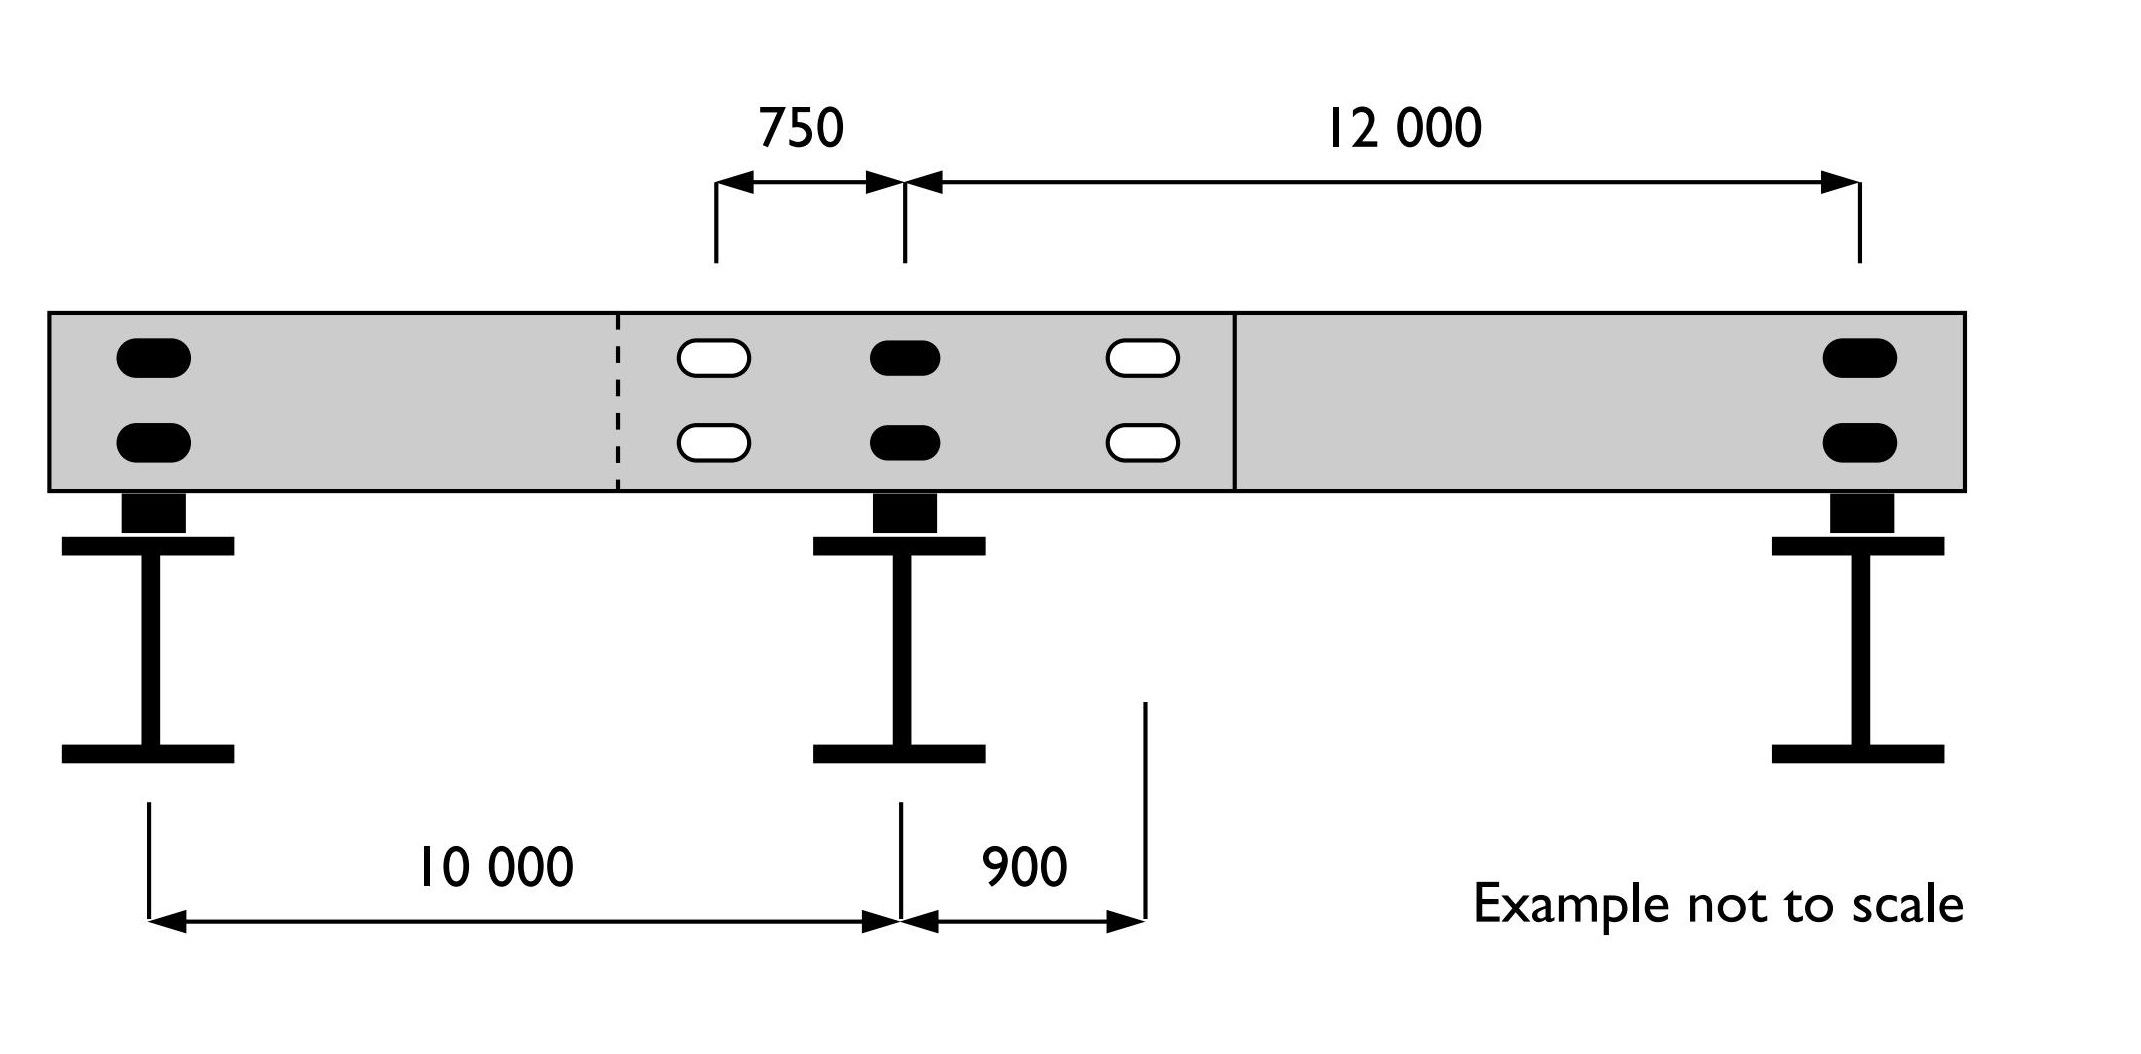
7.2 Aligning and Lapping C Purlins
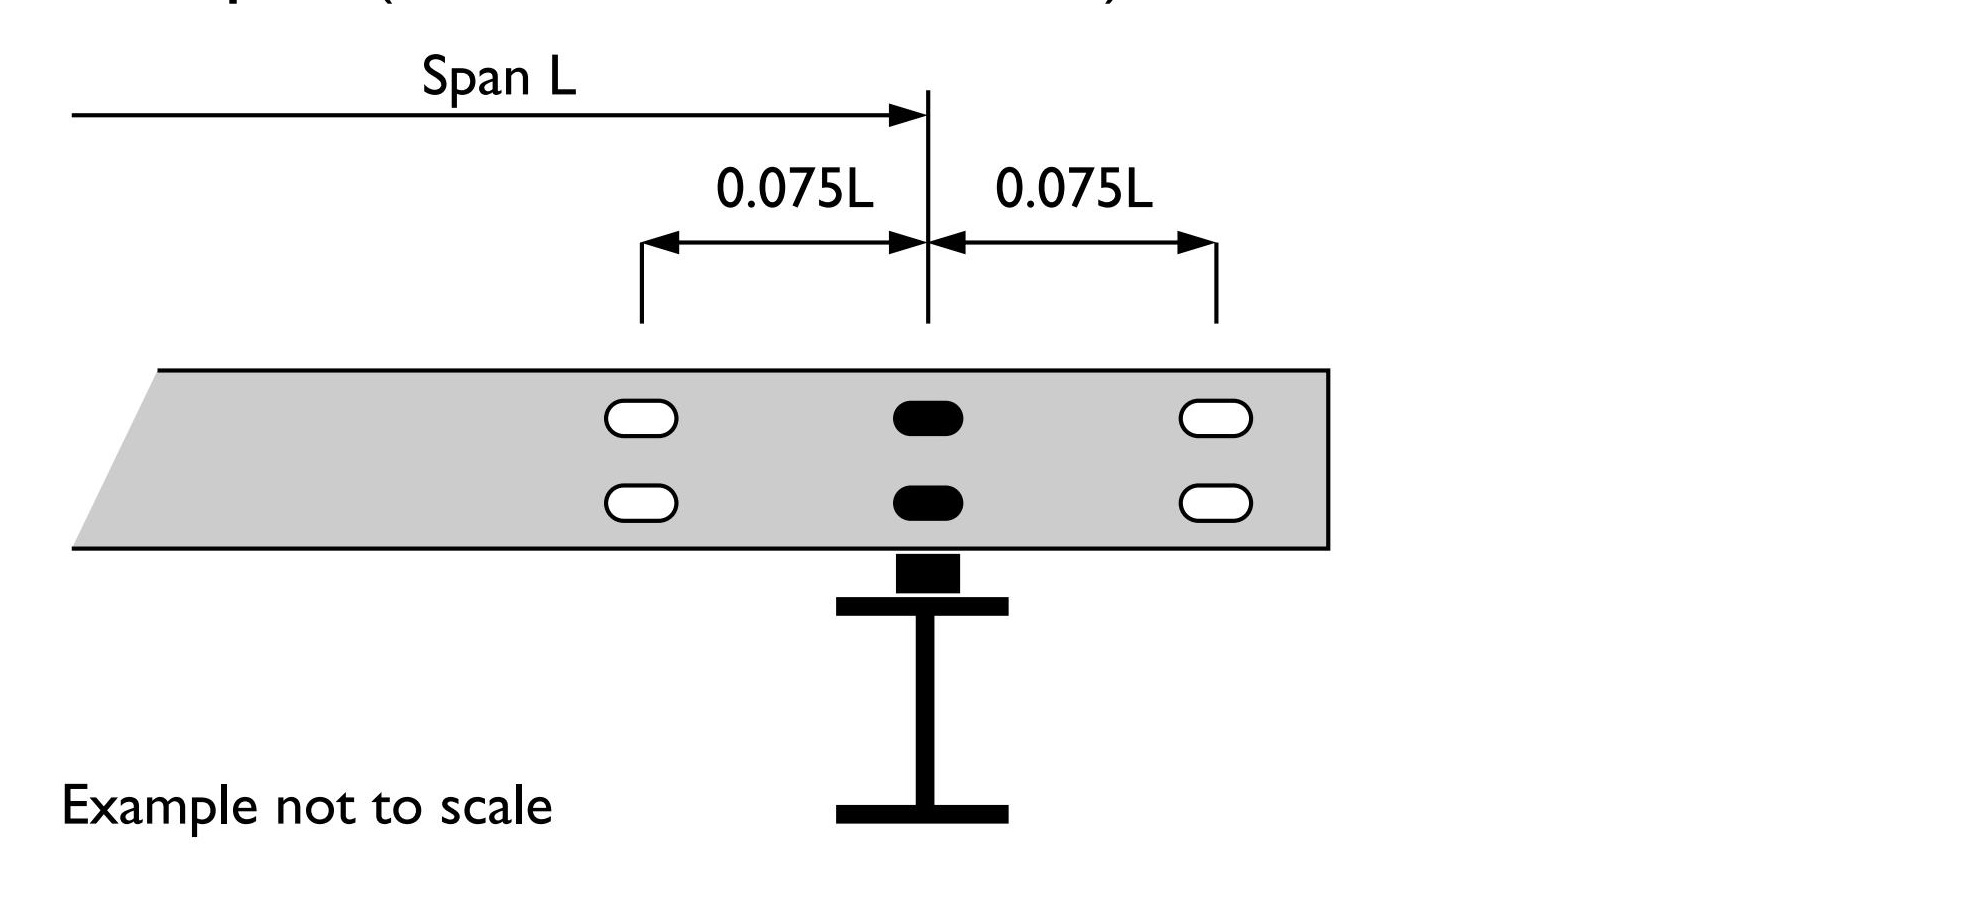
- For lapped connections:
- Z Purlins typically require a lap length of at least 15% of the span (rounded to the nearest 50mm).
- Ensure lap joints are properly aligned to transfer loads evenly.
- Use bottom flange bolts at the lap zone to ensure structural continuity.
7.3 Fastening the Joints
- Use high-strength bolts:
- M12 bolts for purlins between 100mm and 250mm.
- M16 bolts for 300mm to 350mm purlins.
- Bolt placement:
- One bolt in the top web hole.
- Additional bolts in the lower flange holes on both ends of the lap.
- Tighten all bolts before applying loads.
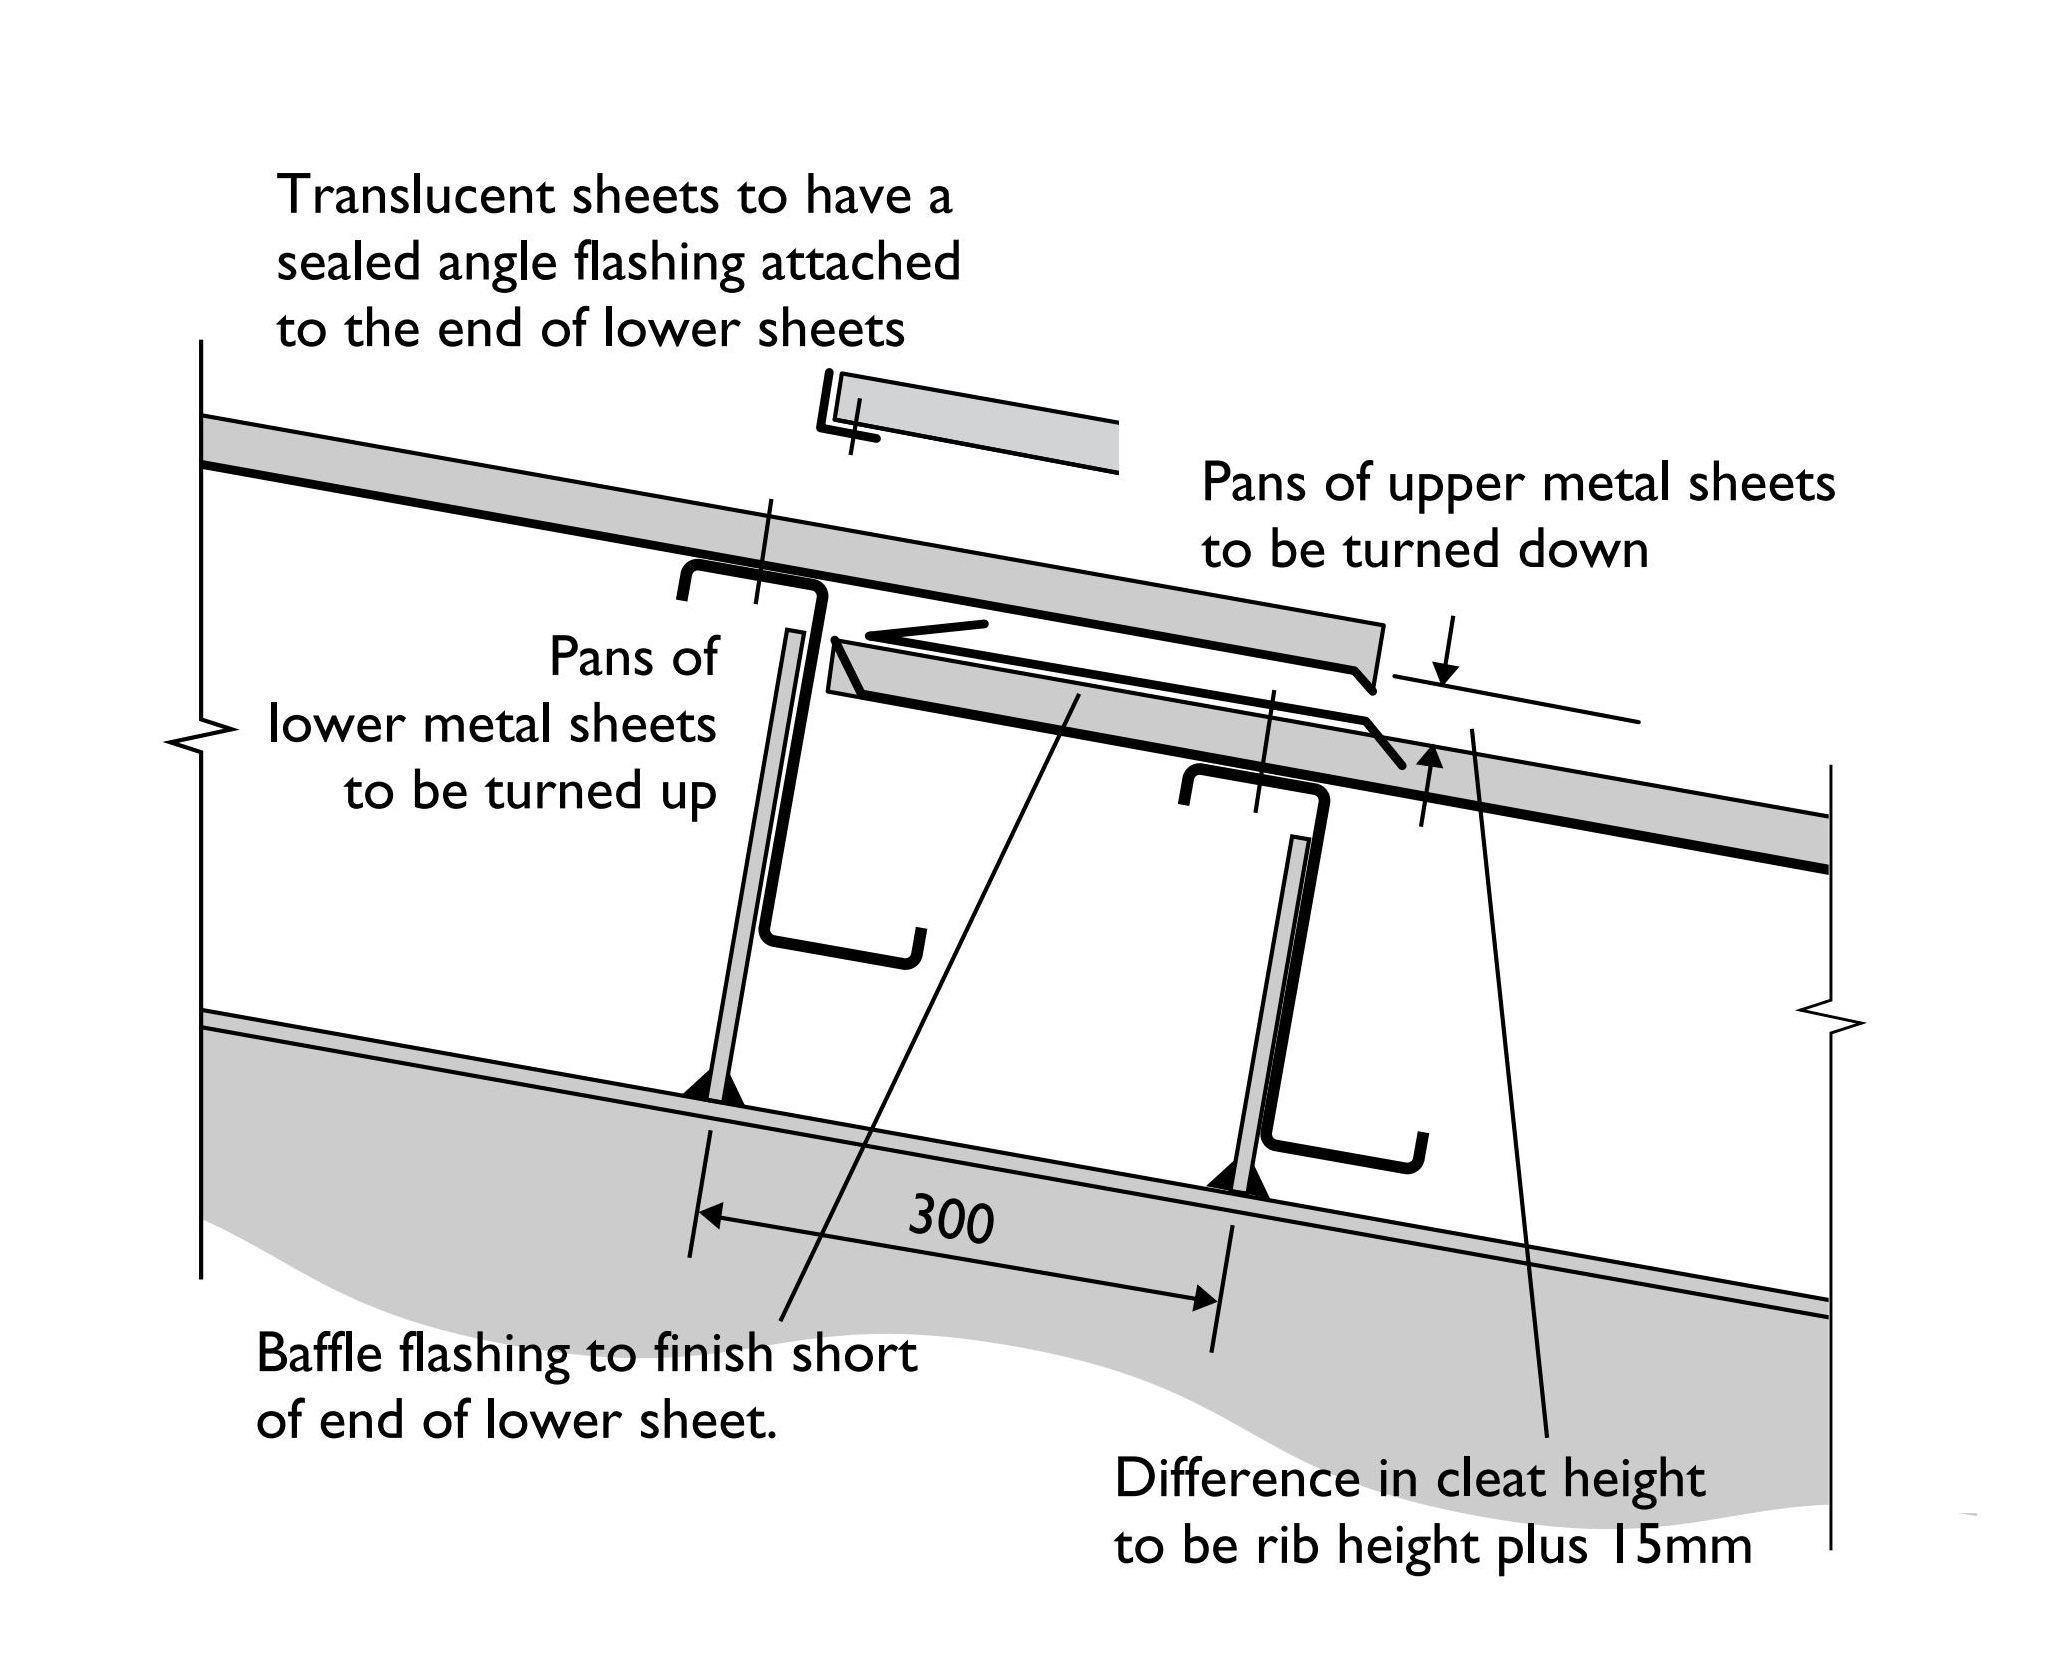
7.4 Installing Bridging for Stability
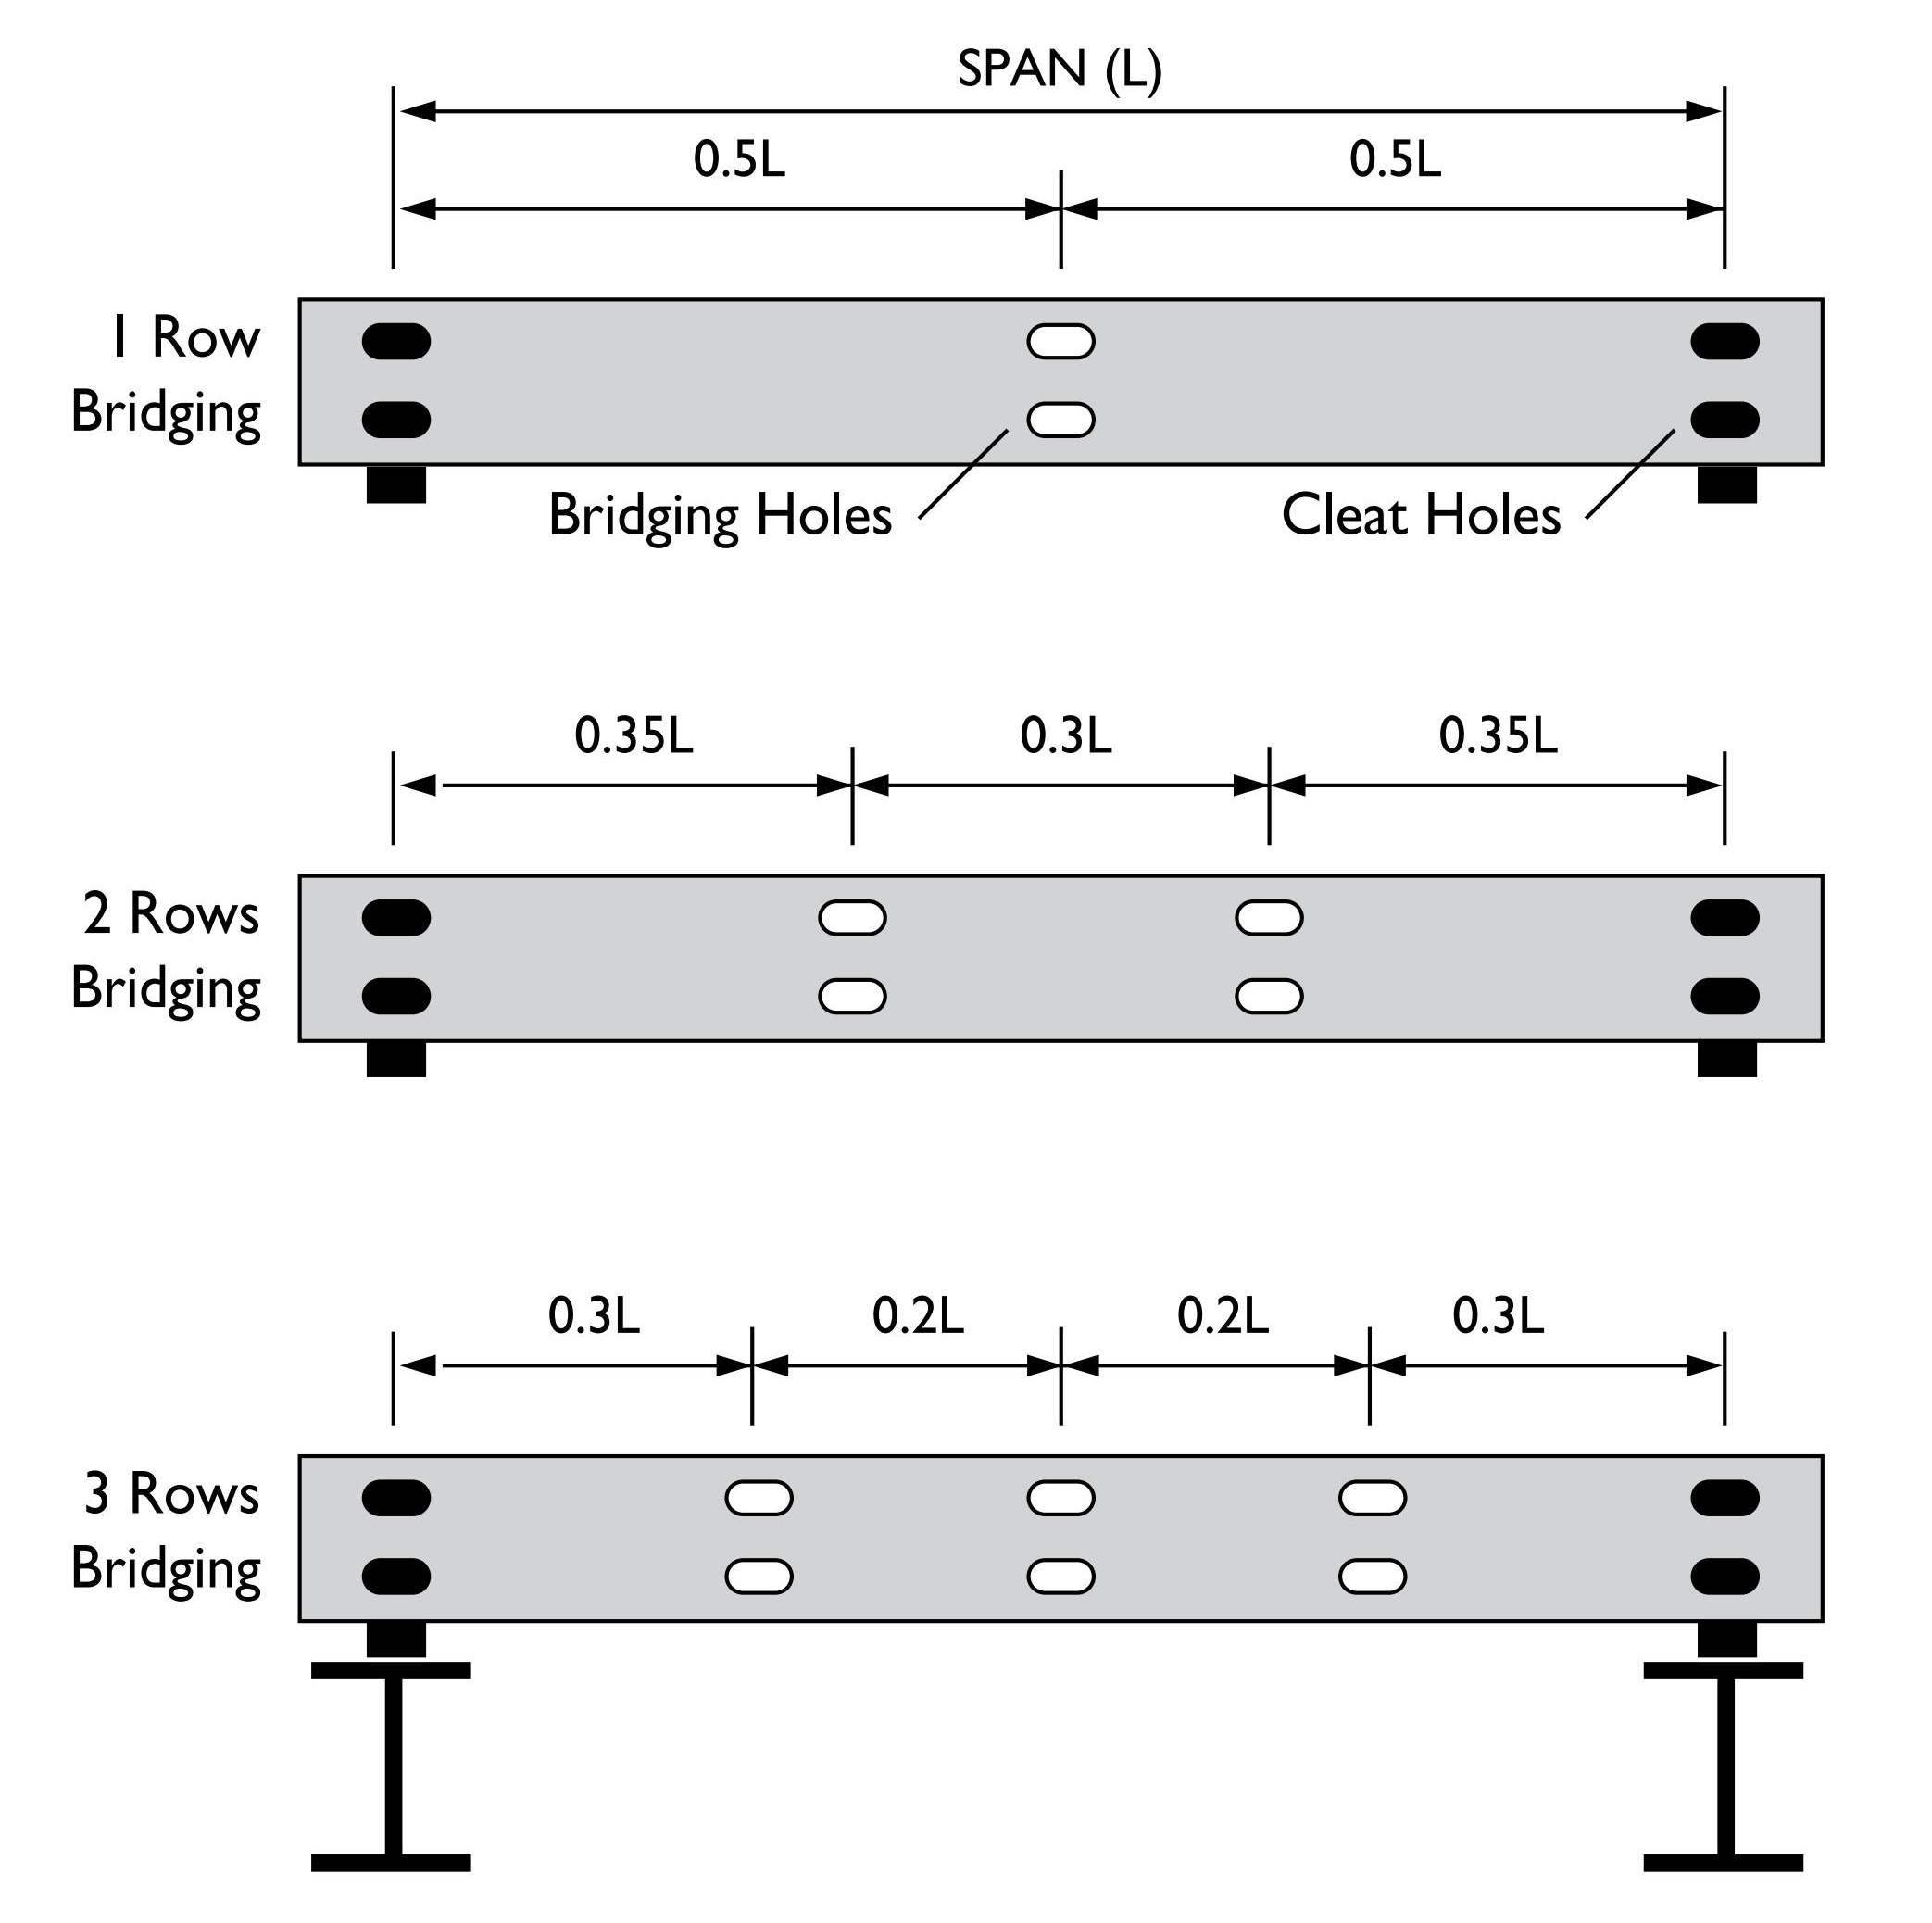
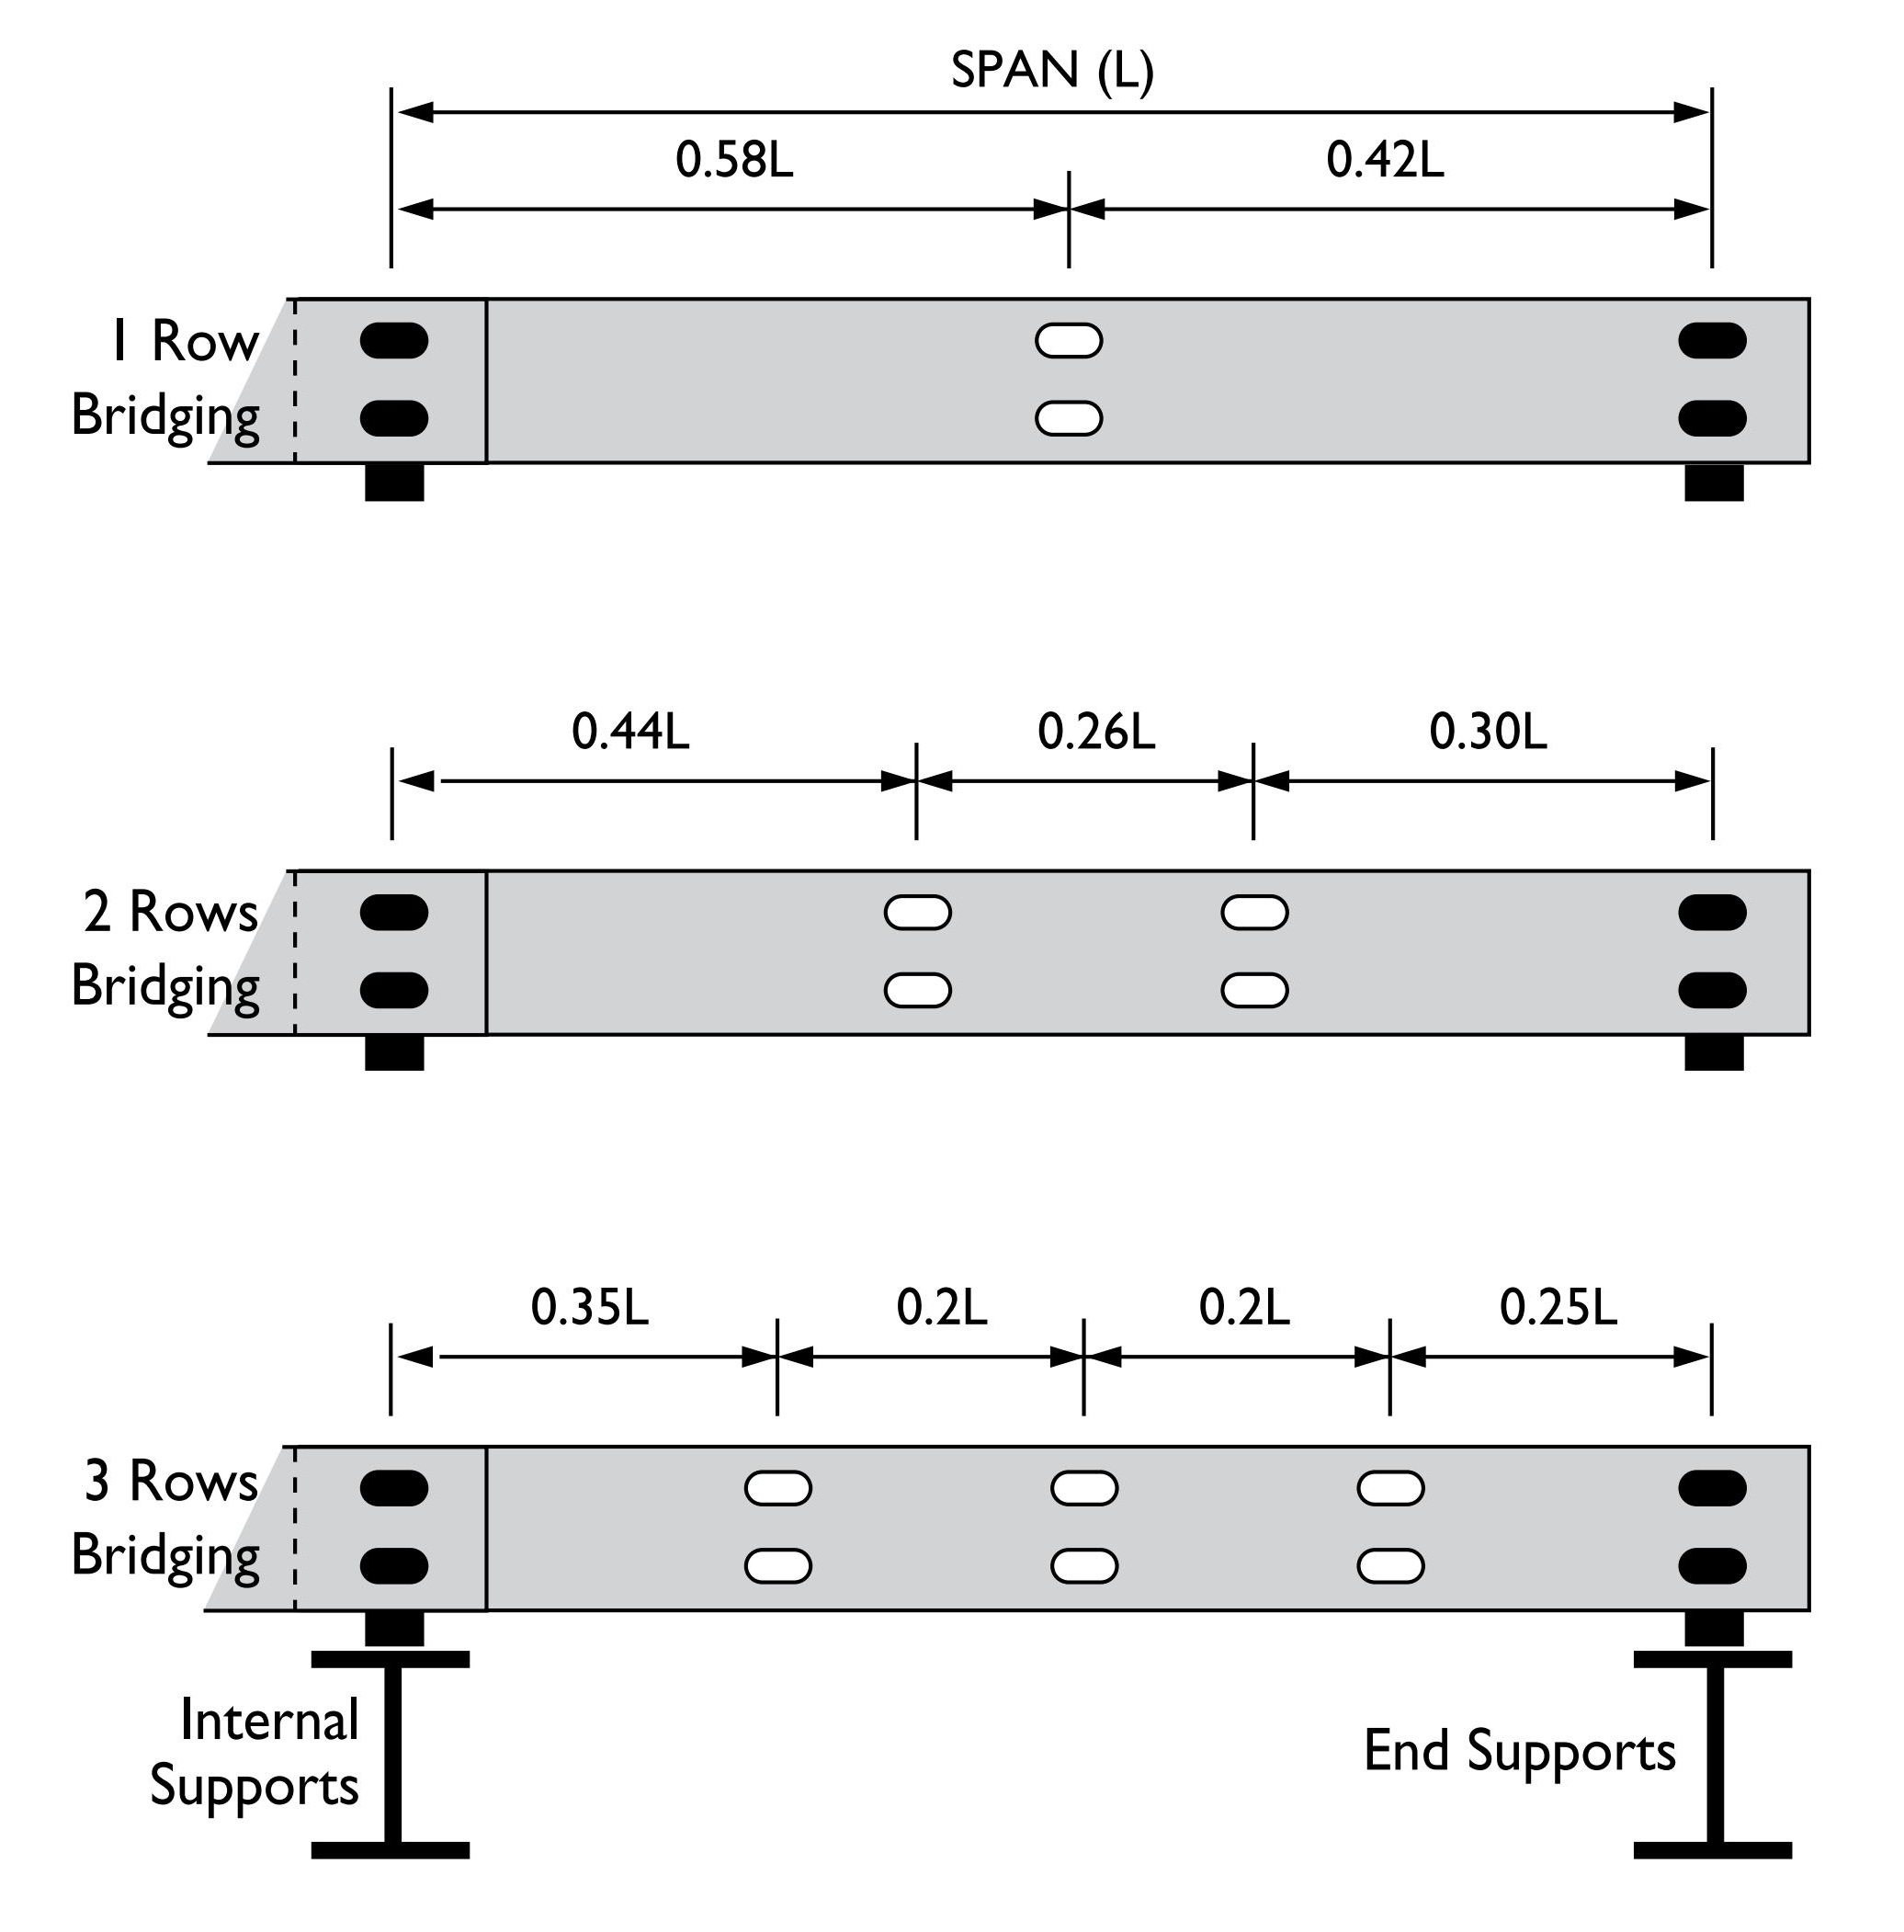
- Bridging reduces lateral-torsional buckling and maintains alignment.
- Maximum unbraced length should not exceed 20 times the web height (20D) or 4000mm, whichever is less.
Types of Bridging
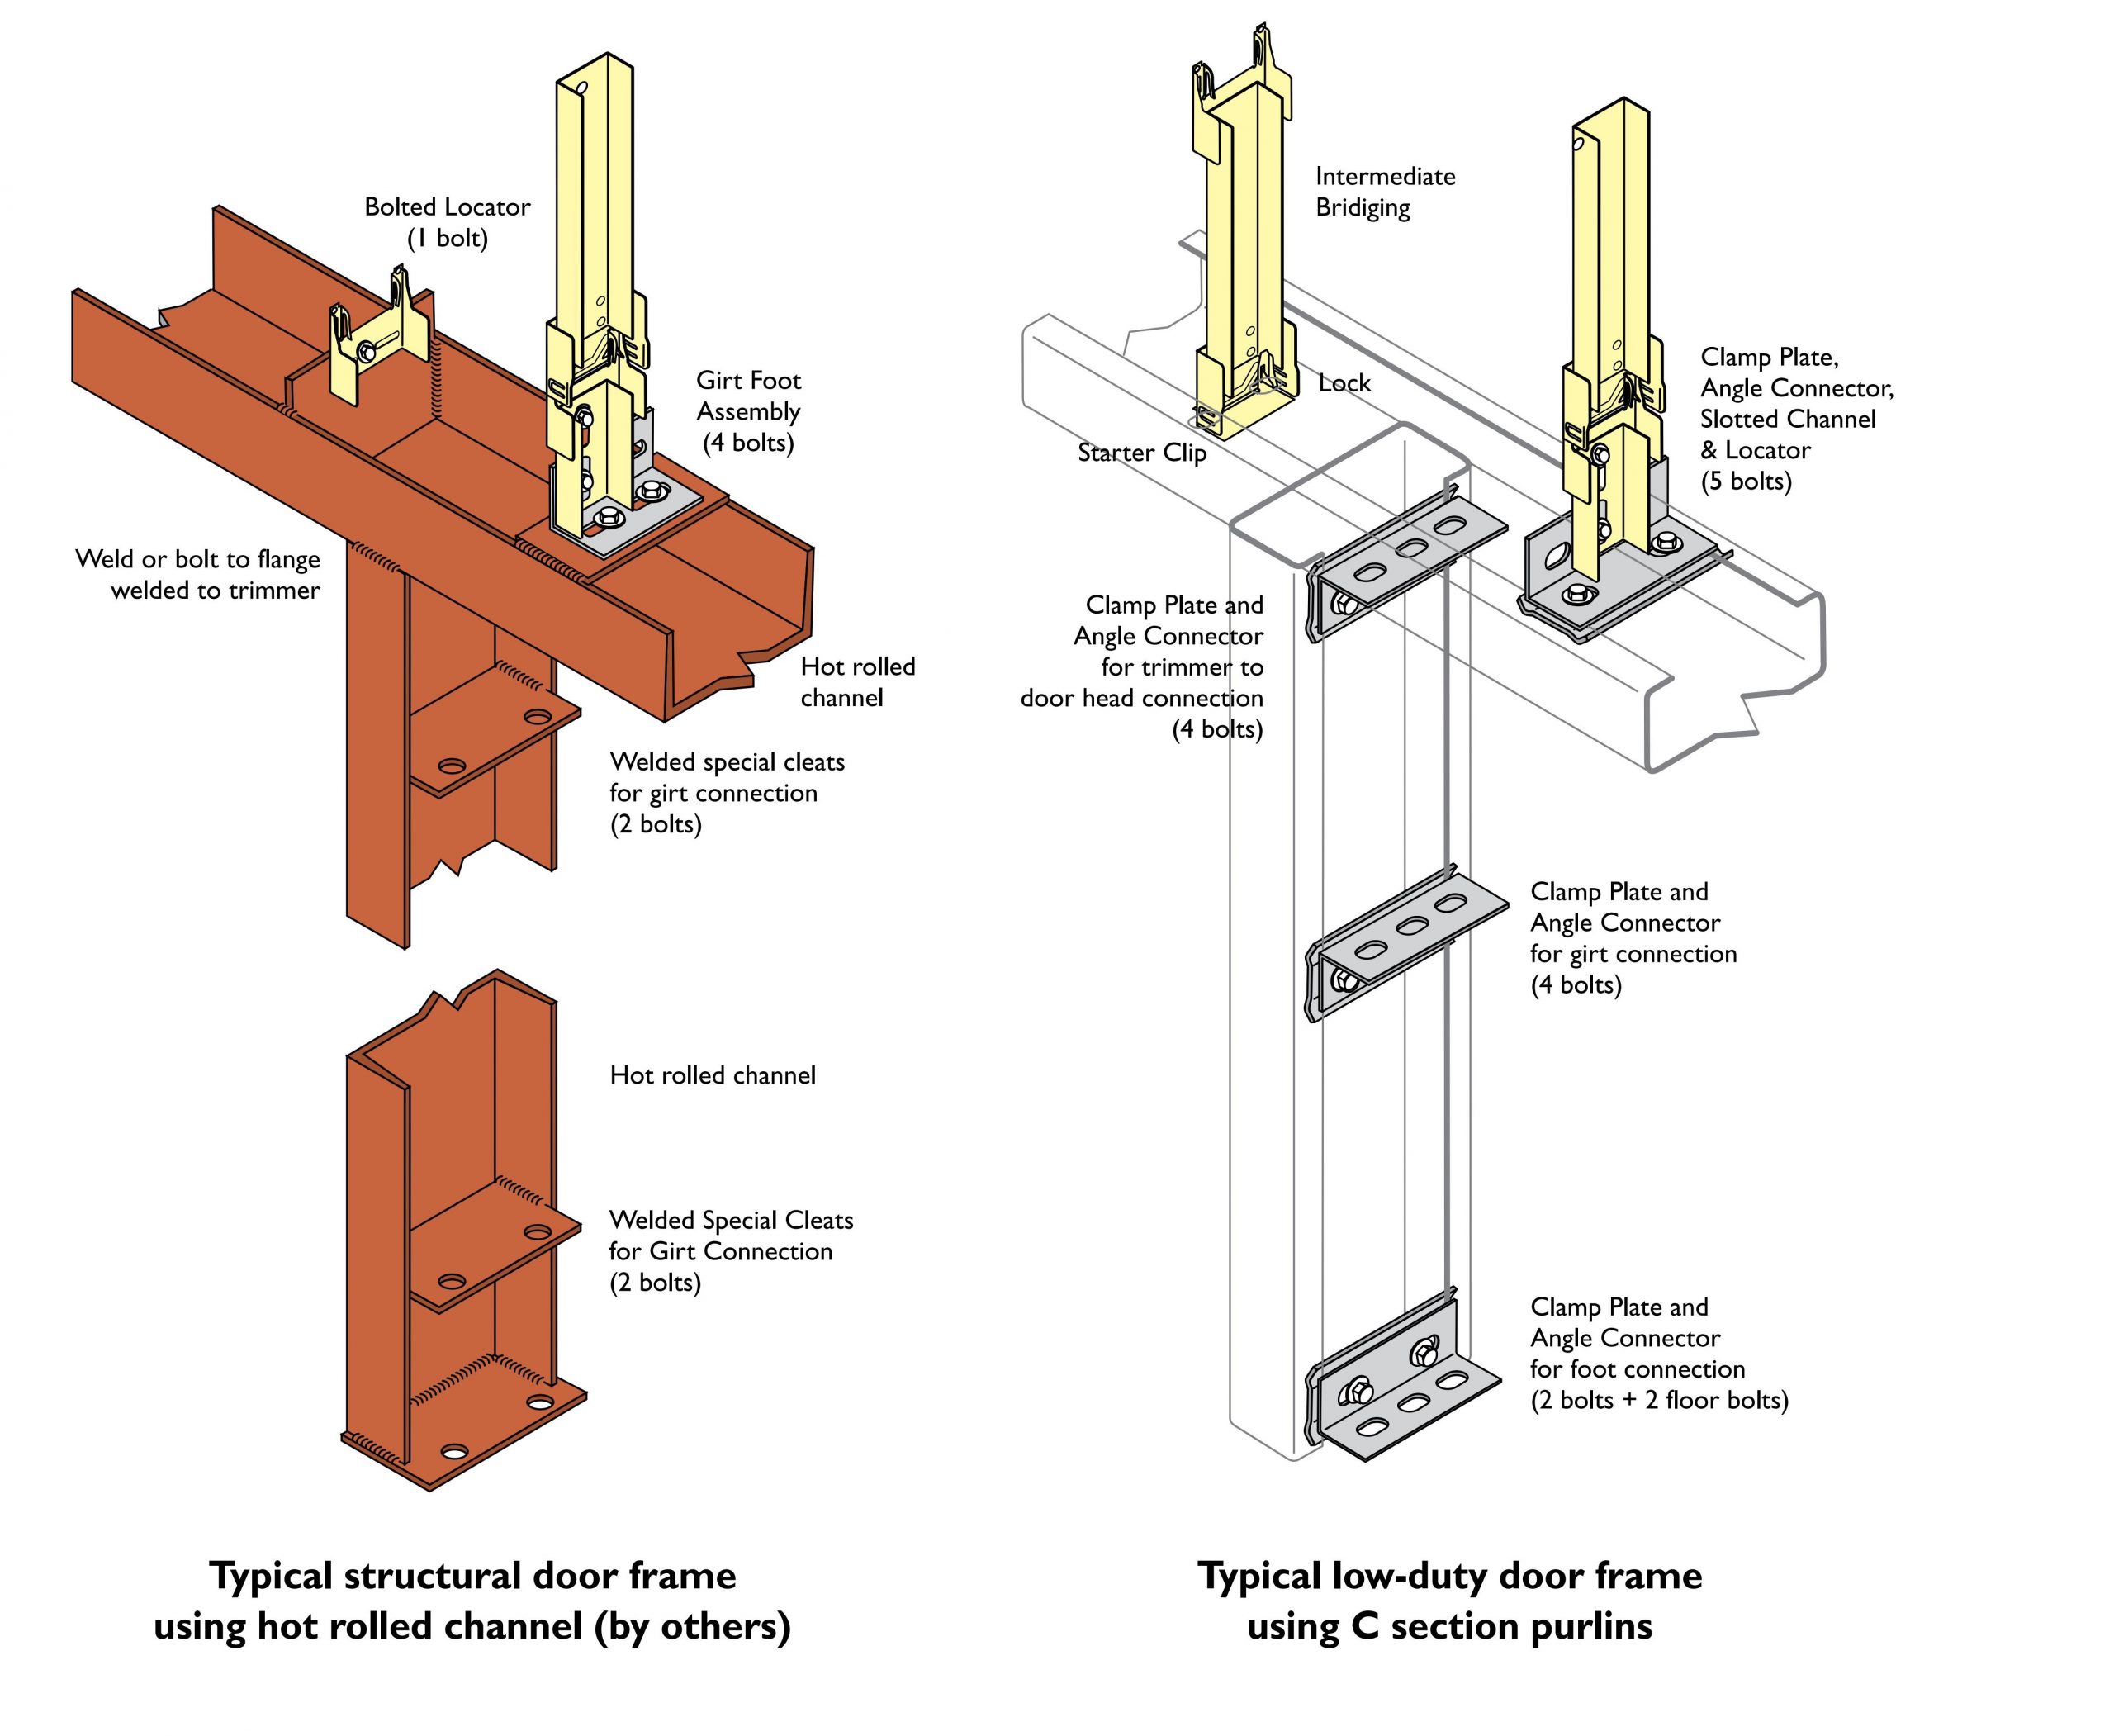
- Boltless Bridging (fast installation; suitable for 100-250 purlin sizes):
- Lock and locator end connection.
- Bolted Bridging (higher load capacity):
- Requires two bolts per connection.
- Large Series Bridging (for 300-350 purlins):
- Uses a C150 channel and larger bolts.
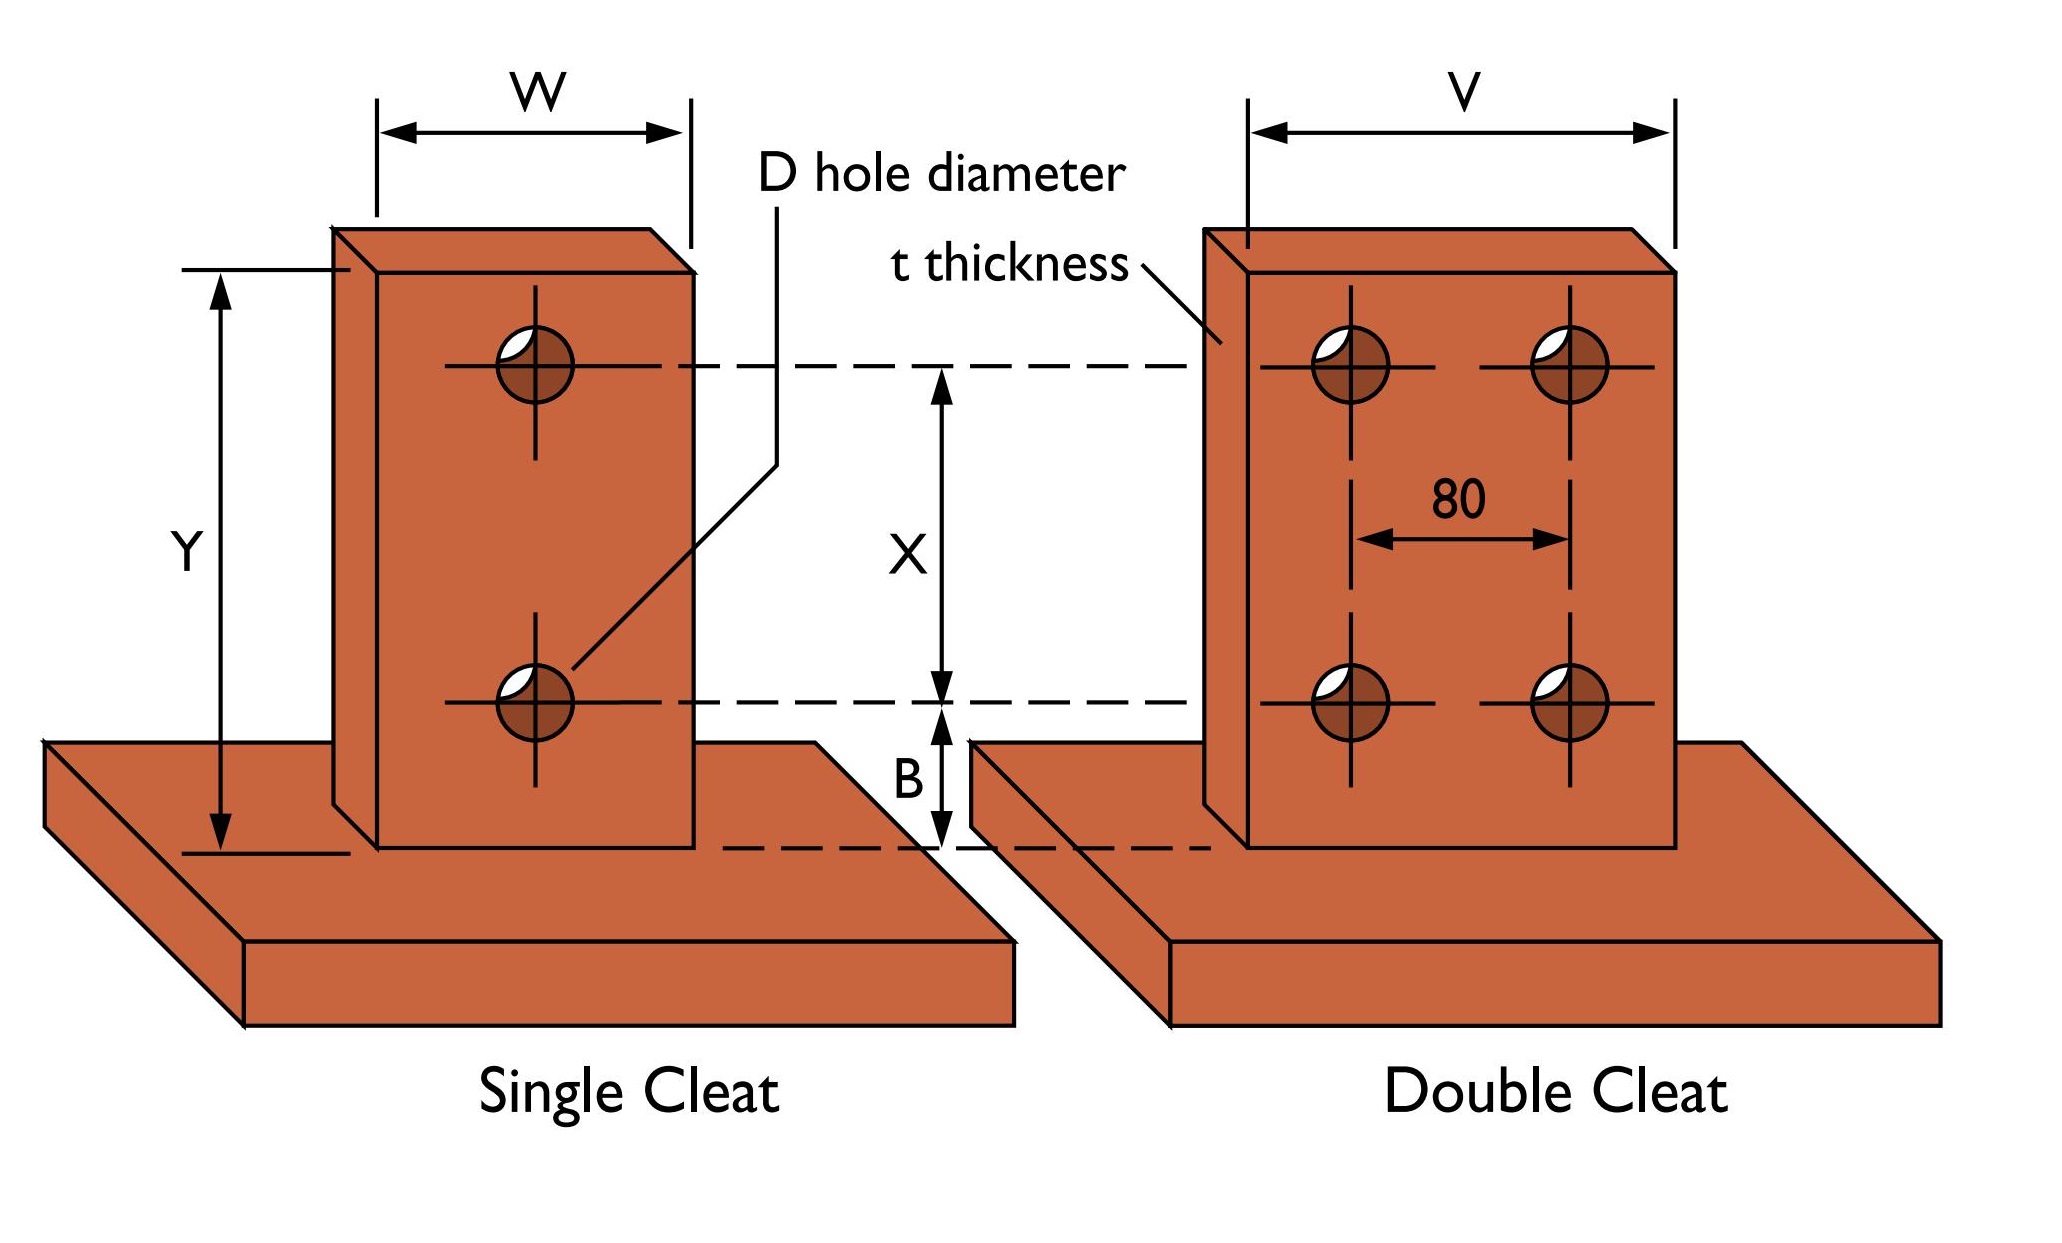
| CLEAT NOMINAL DIMENSIONS (mm) | ||||||||
| Section | X | Bt | Yt | t | Gap | D | W | V |
| 100 | 40 | 40 | 105 | 8 | 10 | 18 | 50 | 130 |
| 150 | 60* | 55** | 145 | 8 | 10 | 18 | 60 | 140 |
| 200 | I10 | 55 | 195 | 8 | 10 | 18 | 60 | 140 |
| 250 | 160 | 55 | 245 | 8 | 10 | 18 | 60 | 140 |
| 300 | 210 | 65 | 305 | 12 | 20 | 22 | 60 | 140 |
| 350 | 260 | 65 | 355 | 12 | 20 | 22 | 60 | 140 |
| *70mm in Victoria
* *50mm in Victoria |
||||||||
| 十 When using downturn lip purlins or girts the lip length must be added | ||||||||
| to dimension B andY. | ||||||||
7.5 Bridging Installation Steps
- Install fascia bridging.
- Insert intermediate bridging.
- Secure ridge bridging.
- Adjust bridging alignment before tightening.
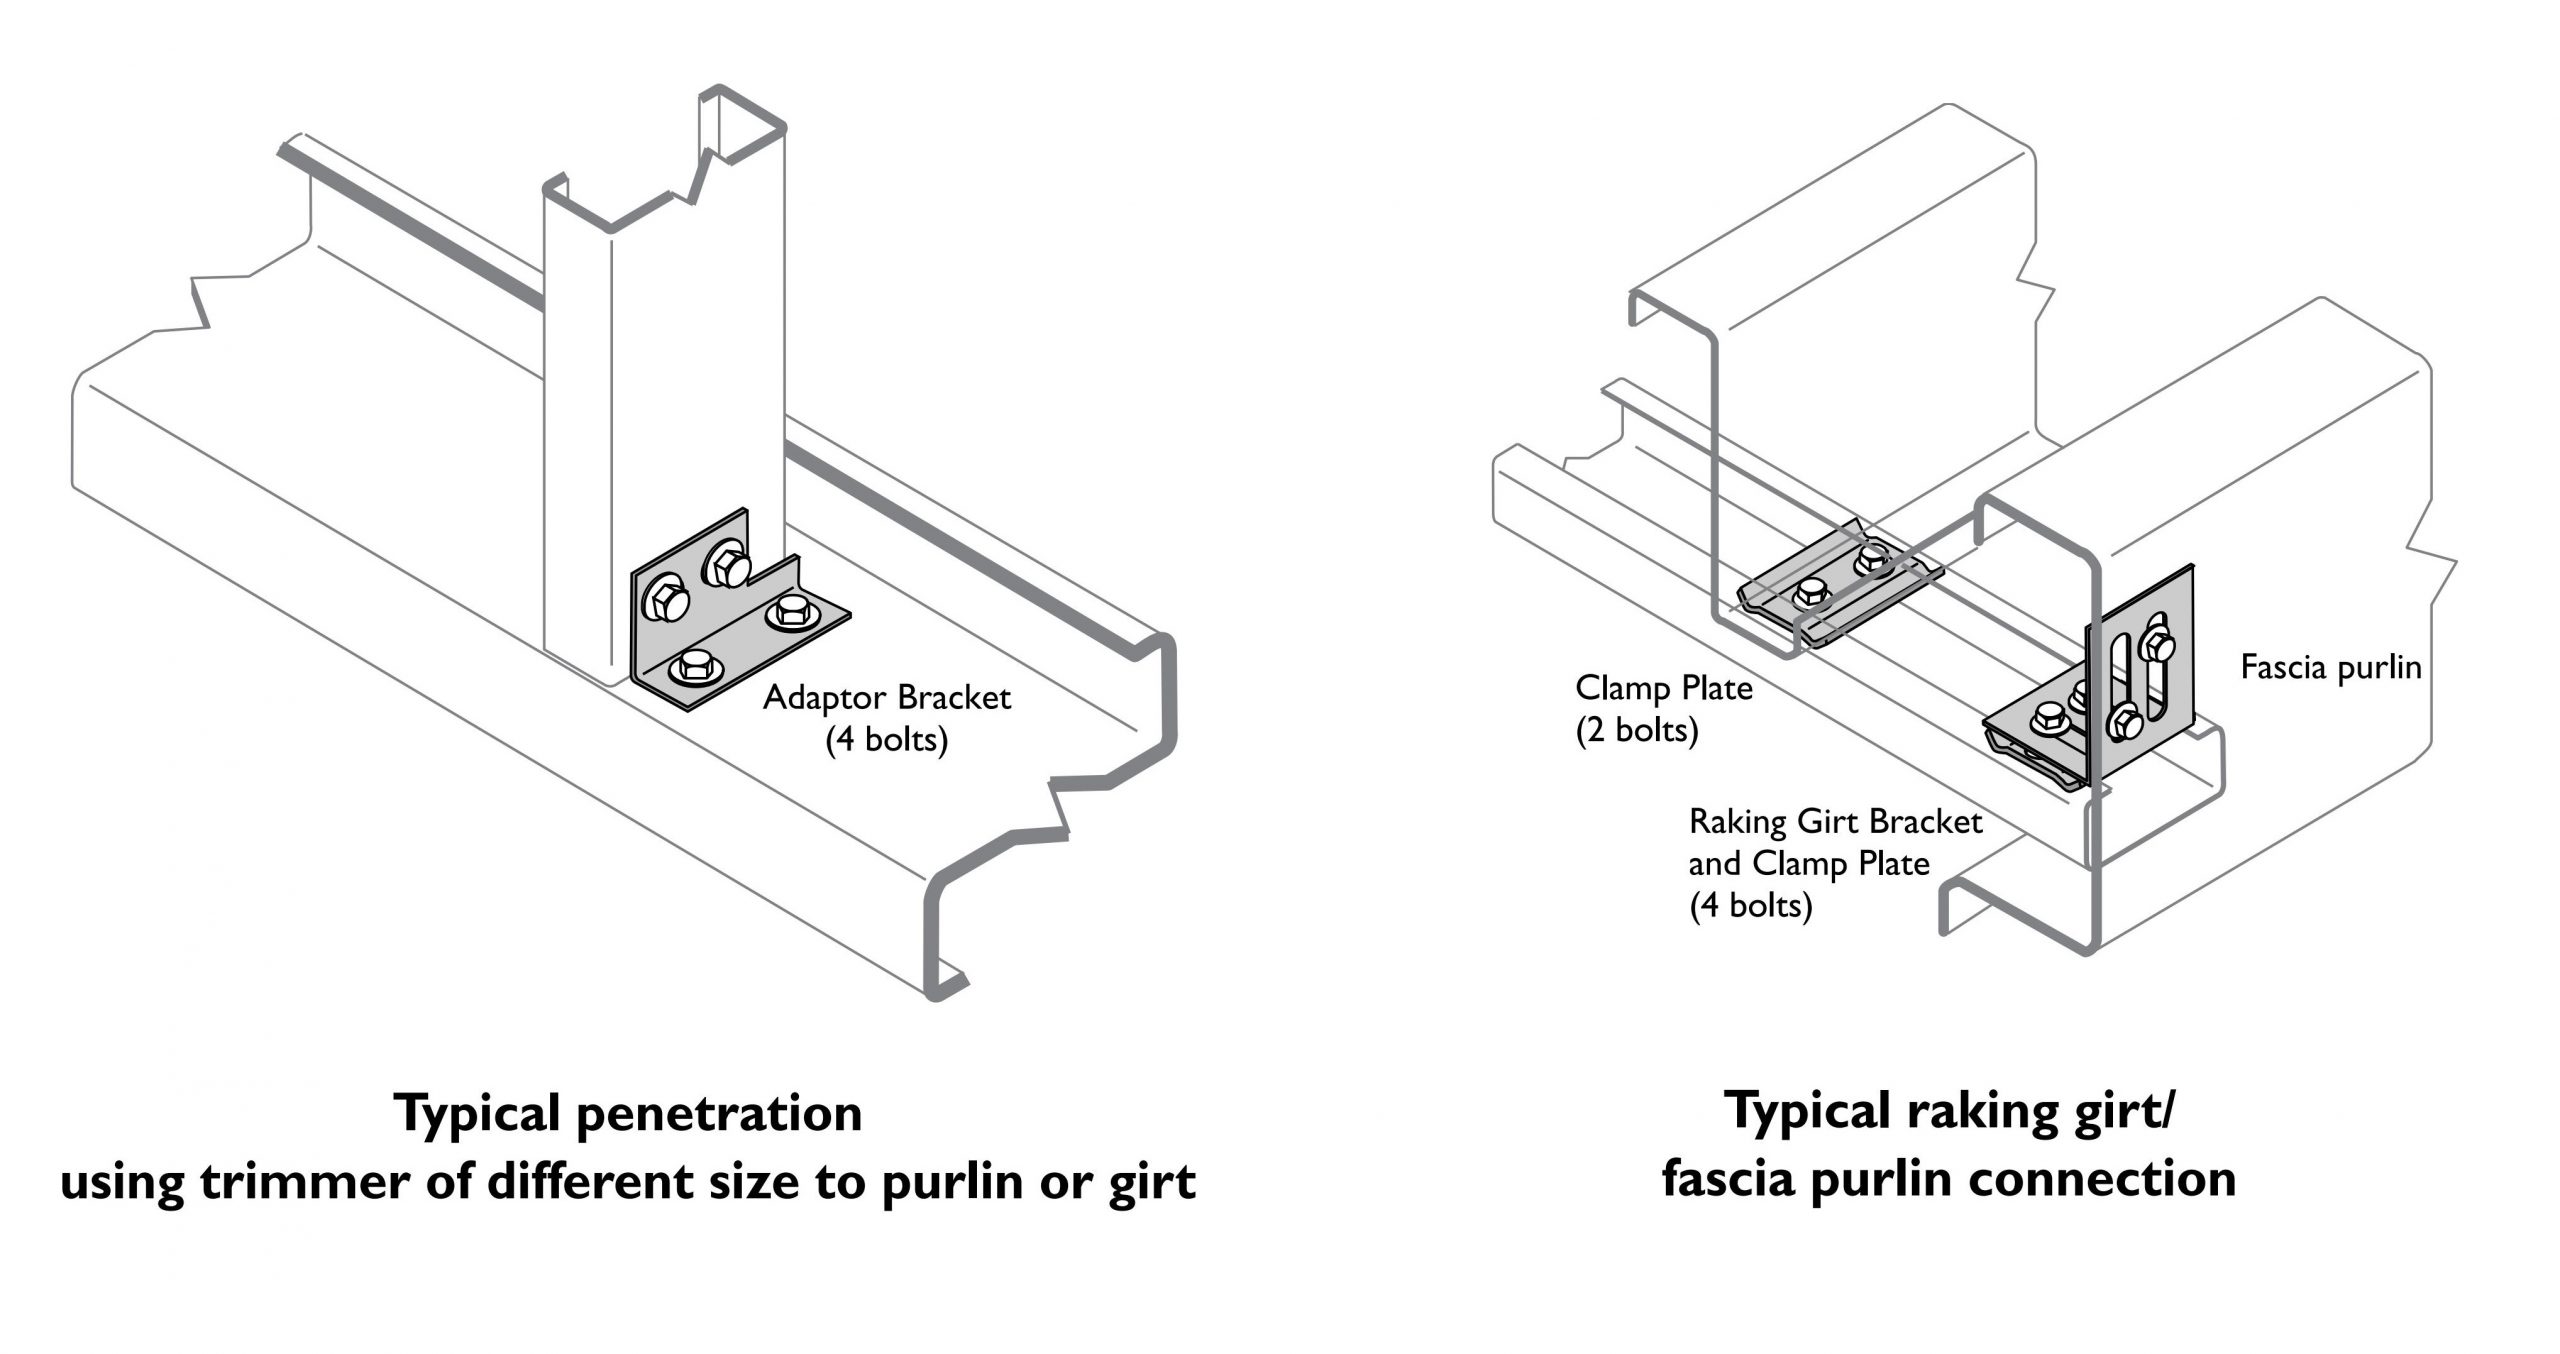
7.6 Fly Bracing
- If required by design, install additional fly bracing with specified bolts to enhance stability.
7.7 Roofing Mesh and Hangers
- Safety Mesh:
- Install according to national safety and insulation support standards.
- Hangers:
- Do not hang loads from the flange or lip.
- Suspended loads must be connected to hangers attached to the purlin web.
7.8 Welding
- Welding is not recommended for purlins, girts, or bridging:
- Welding compromises the strength of high-tensile cold-formed steel.
- It also removes the protective galvanized coating.
8.0 Inspection and Final Adjustments
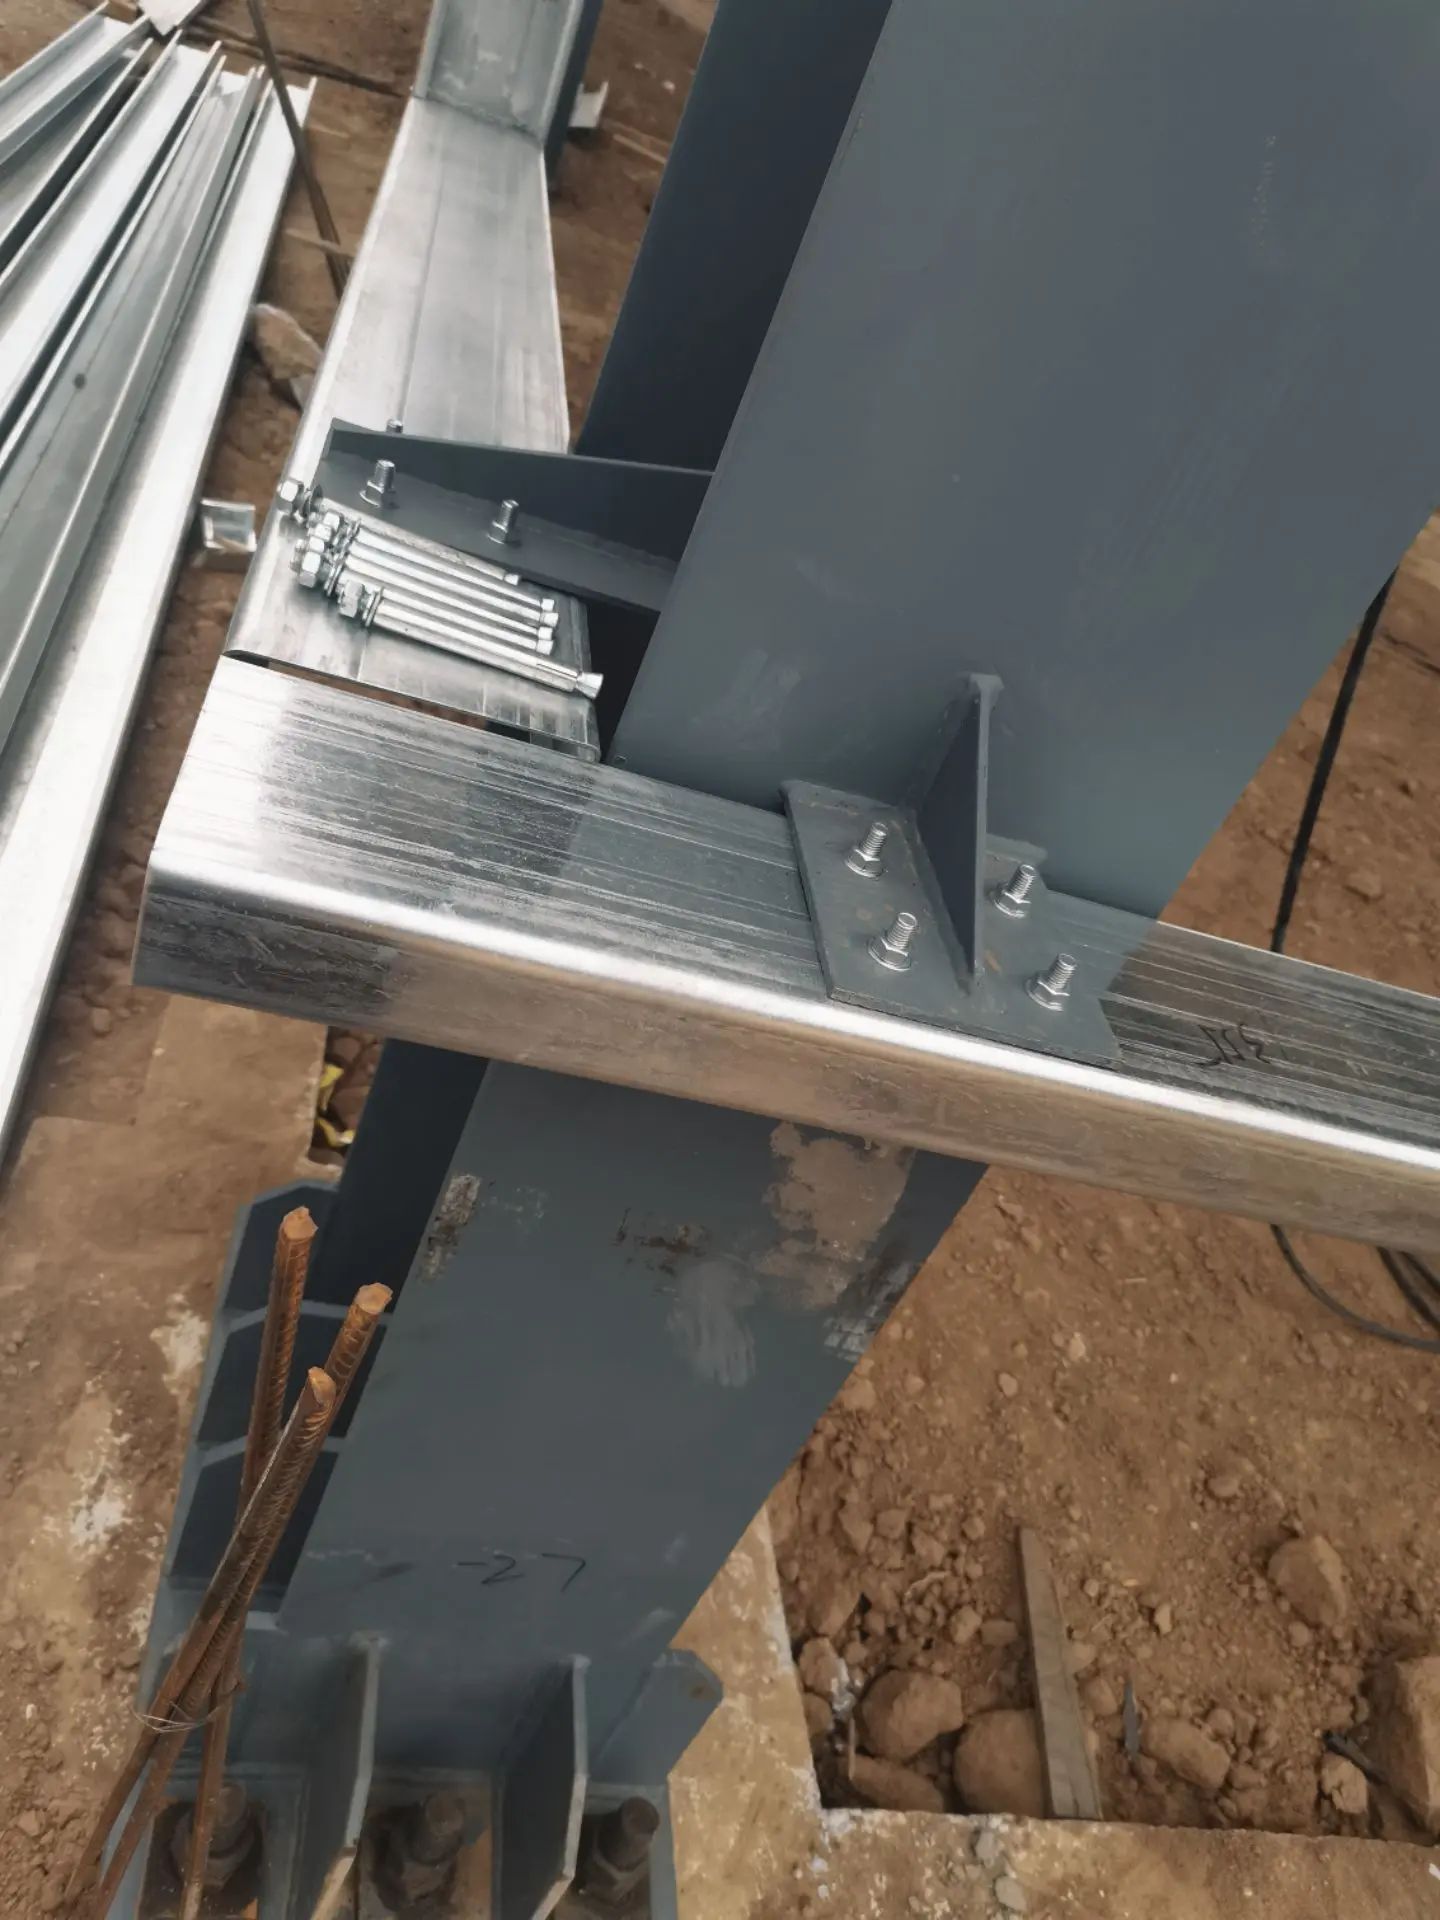
Pre-Installation Inspection
- Check purlin labels, dimensions, and hole locations against design specifications.
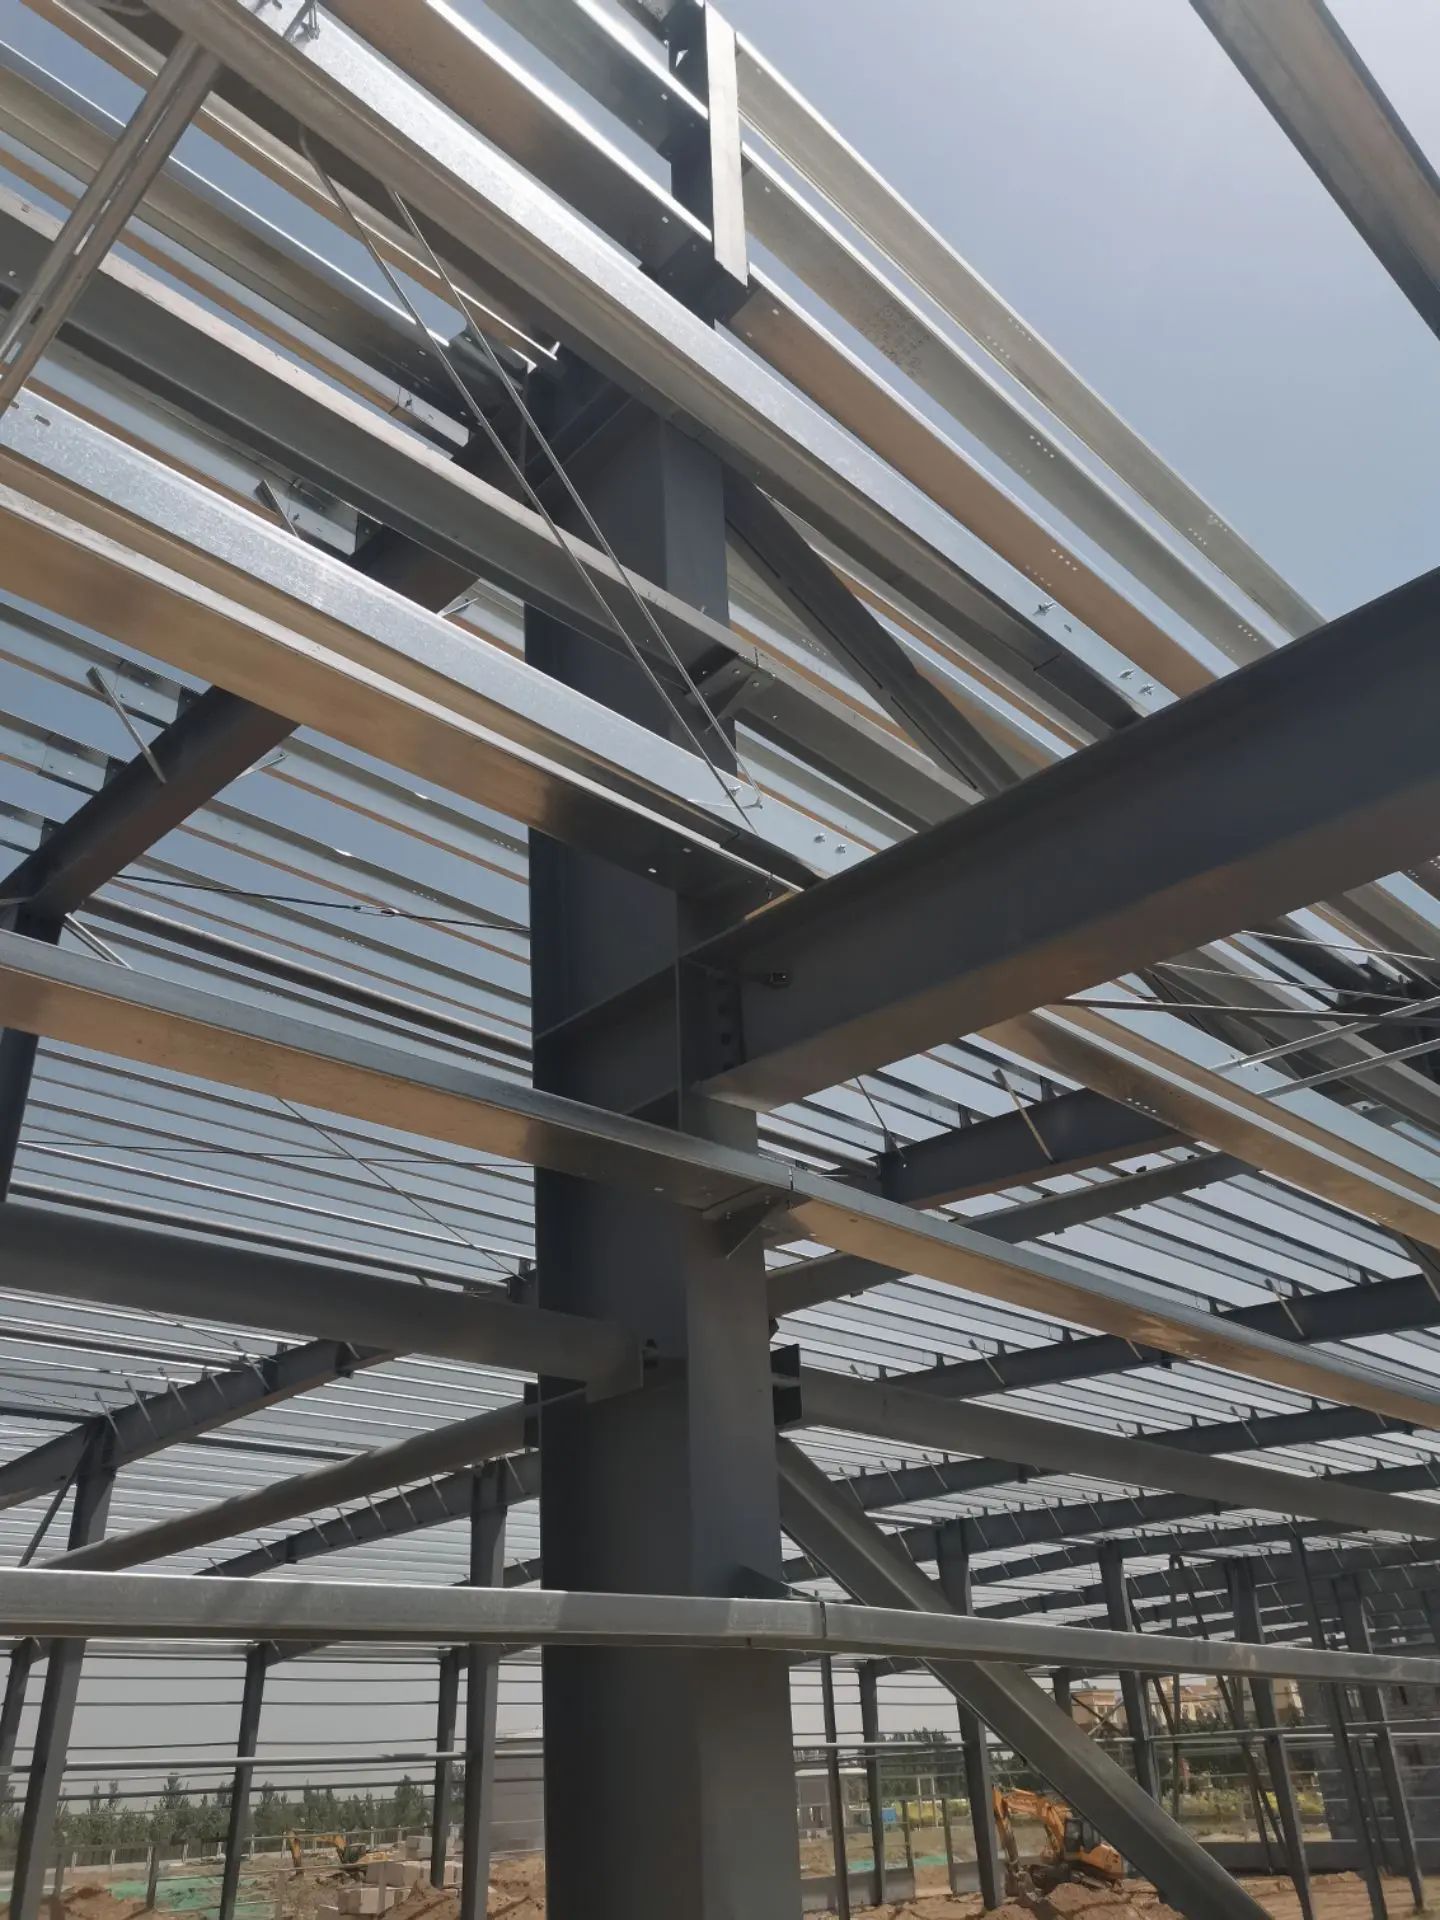
Post-Installation Inspection
- Ensure all bolts are fully tightened.
- Verify that bridging and lap joints are correctly installed and aligned.
- Use turnbuckles or fasteners for fine adjustments if necessary.
9.0 Common Mistakes to Avoid
| Mistake | Impact | Solution |
| Incorrect spacing | Roof or wall failure due to insufficient support. | Follow engineering specifications. |
| Wrong purlin size | Sagging, buckling, or collapse. | Use load tables and consult engineers. |
| Improper fastening | Misalignment and instability. | Use correct bolts; tighten fully. |
| Overloading | Structural failure due to excessive weight. | Calculate all loads (roofing, wind, snow). |
| Poor alignment | Uneven load distribution and premature failure. | Regular inspections and accurate measuring. |
10.0 Additional Tips for Safe and Effective Installation
- Never walk on unsecured purlins; they may twist or collapse.
- Always use fall protection (harnesses) when working at height.
- Use lifting equipment or scaffolding; avoid standing on purlins or bridging.
- Incorporate expansion joints in long spans to accommodate thermal movement.
- Do not over-tighten roofing mesh if insulation is used; this can interfere with roof sheeting.
11.0 Conclusion
Proper selection, installation, and connection of C Purlins are essential for the structural integrity and longevity of roofing and wall framing systems. By following this comprehensive guide and adhering to best practices, you can ensure safe, stable, and durable structures.
For best results:
- Follow manufacturer guidelines and national standards (AS/NZS 4600, AS3828, AISC, etc.).
- Consult structural engineers when in doubt.
- Use high-quality materials and professional tools.
References:
https://www.stramit.com.au/


